Windows 10 comes with a hidden administrator account that has access to all the resources on your computer. Because of security reasons, this account is disabled by default. However, there are times when you may require performing certain troubleshooting methods using the administrator account.
In these circumstances, you can enable the administrator account on Windows 10 and once done, disable it. That’s why in this article I have discussed how to enable or disable administrator account on Windows 10.
Also, check out:
Why Enable The Built-In Administrator Account?
Contents
The built-in administrator account is not different from the user administrative account that you first set up. If for some reason you are unable to access the user administrator account, either if you have forgotten the password, or got locked out, you can use the built-in administrator account to recover it or perform other troubleshooting methods.
The built-in administrator account exists primarily for OEM system builders. The OEM system builders may want to make some changes to the system before it is complete. The built-in administrator account allows them to make these changes.
How To Enable The Built-In Administrator Account?
The easiest way to enable the built-in administrator account in all versions of Windows 10 by using the command prompt. To use the command prompt for enabling the built-in administrator account, follow the steps given below:
- Press the Windows + R keys to open the Run utility.
- Type cmd and press Ctrl + Shift + Enter to open an elevated Command Prompt.
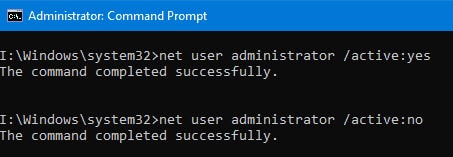
- Now, type the following command:
net user administrator /active:yes and press Enter.

This will enable the built-in Administrator account on your PC. Now to turn off administrator account, check the methods given below.
How To Disable Administrator Account On Windows 10?
In Windows 10 disable administrator account easily with these 2 methods.
Windows 10 Disable Built-In Administrator Account From Command Prompt
To turn off administrator account from the command prompt, follow the steps given below:
- Open an elevated Command Prompt again.
- Type the following command and press Enter:
net user administrator /active:no
This will again hide the administrator account on your computer.
Windows 10 Disable Built-In Administrator Account From Computer Management
To disable administrator account from Computer Management, follow the steps given below:
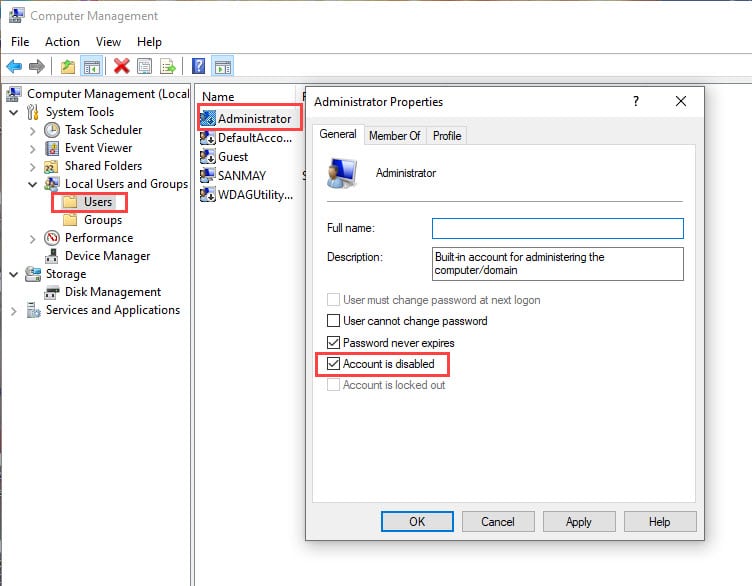
- Right-click on My Computer and select the Manage option from the right-context menu.
- Navigate to the following location:
System Tools > Local Users and Groups > Users - Now, right-click on the Administrator option in the right panel and select the Properties option.
- Check the Account is disabled box and click on Apply and OK to save the changes.

After completing the above steps, you will turn off the administrator account.
Wrapping Up
So, there you have it. Now you know how to enable or disable administrator account on Windows 10. If you have any questions related to this topic, ask them in the comment section below.
Leave a Reply