Microsoft’s telemetry feature tracks all your computer activities and sends it to Microsoft. This has left many users concerned about their privacy, as Microsoft actively collects the user information in the background. In an earlier version of Windows like Windows 7, telemetry only collected the required data for its updates. However, in Windows 10, it tracks all your daily computing habits.
It’s wise to never let anyone have so much information about you. However, in Windows 10 you can’t just disable telemetry completely from the GUI menu. But there are other methods you can use to do it. In this article, we have discussed how to disable telemetry in Windows 10.
Also, check out this article on how to turn off display in Windows 10.
Disable Telemetry In Windows 10
Contents
In Windows 10 disable telemetry data collection is an urgent requirement for every user. Microsoft may say that they use the data for updating Windows or enhance the security, in my opinion, they are overdoing it by a mile. It is each user’s right to decide what data they share and what they keep private. Microsoft, however, does not allow users to turn off telemetry completely.
It’s still your right to protect your data. The following methods given can significantly decrease the amount of data that telemetry collects. Even if you can’t completely stop them, you can set a limit.
Method 1: Change Privacy Settings
Most of the options on the Privacy settings are on by default for telemetry to collect the data. You can disable these and limit telemetry significantly. To change Privacy settings, follow the steps given below:
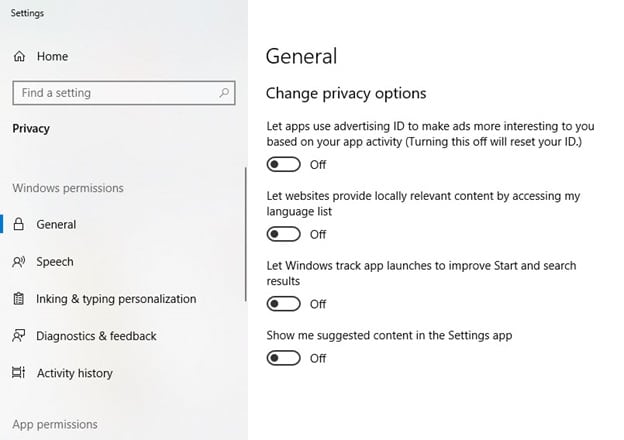
- Open the Search bar and type Privacy settings. Select the appropriate option.
- In the General section, disable everything.
- Next, select the Diagnostic and Feedback option.
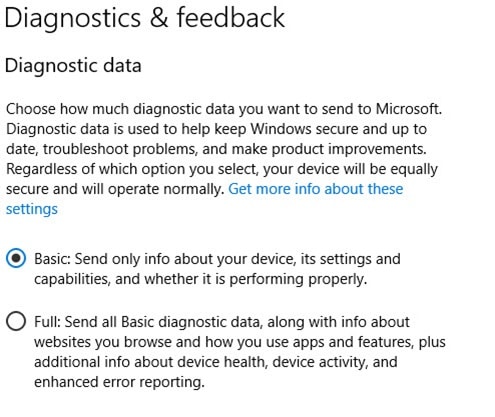
- Change the Diagnostic data to Basic.
- Also, disable the Tailored experience toggle.
- You can further disable allowing apps to access your location, contacts, messages. Just keep scrolling through the settings and disable anything you don’t want to share.

Method 2: Disable Microsoft Compatibility Telemetry
This is an advanced method as it will disable the main service for telemetry data collection. Disabling it will affect all the applications that use the Compatibility telemetry services.
This method will also stop telemetry from collecting your system data. To disable the Compatibility telemetry services, follow the steps given below:
- Open the Run utility by pressing the Windows + R keys.
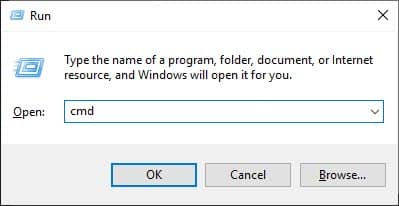
- Type cmd in the search bar and press Ctrl + Shift + Enter to open an elevated Command Prompt.
- Enter the following commands in the given order:
sc delete DiagTrack , press Enter
sc delete dmwappushservice , press Enter
echo “” > C:\\ProgramData\\Microsoft\\Diagnosis\\ETLLogs\\AutoLogger\\AutoLogger-Diagtrack-Listener.etl , press Enter
reg add “HKLM\\SOFTWARE\\Policies\\Microsoft\\Windows\\DataCollection” /v AllowTelemetry /t REG_DWORD /d 0 /f , press Enter
- After the above commands finishes running, restart your PC
Method 3: Disable Using From The Registry Editor And Services App
This is the GUI method of the steps in Method 2, and should be done carefully. In this method, you will have to disable Windows 10 telemetry collection service using the Registry Editor and the Services app.
Caution: Using this method will hinder the PC’s ability to fetch and install Windows updates.
If you want to use this method, then follow the steps given below:
- Open the Run utility again.
- Type regedit in the search bar and press Enter to open the Registry Editor.
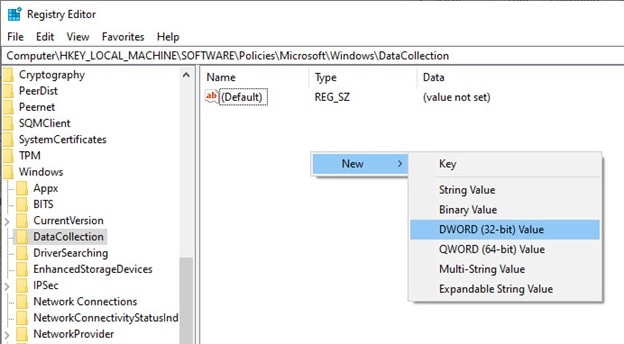
- Now, navigate to the following registry key:
HKEY_LOCAL_MACHINE\SOFTWARE\Policies\Microsoft\Windows\DataCollection - In the right panel after selecting the DataCollection key, right-click on the open white area.
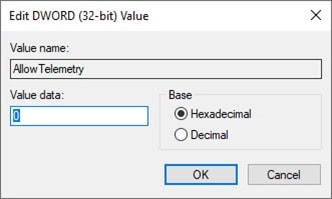
- Select the New option and then click on the DWORD (32-bit) Value option. Name the DWORD AllowTelemetry and open it.
- Next, change the Base to the Hexadecimal option and set the Value data to 0.
- Click on OK to save the new DWORD.
- Now, open the Run utility again and search services.msc. This will open the Services utility.
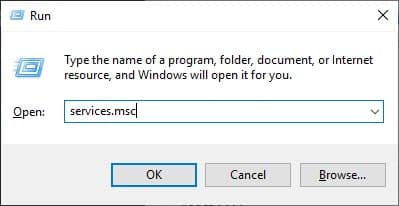
- Locate the Connected User Experiences and Telemetry service and double-click on it to open its properties.
- In the General tab, change the Startup type to Disabled.
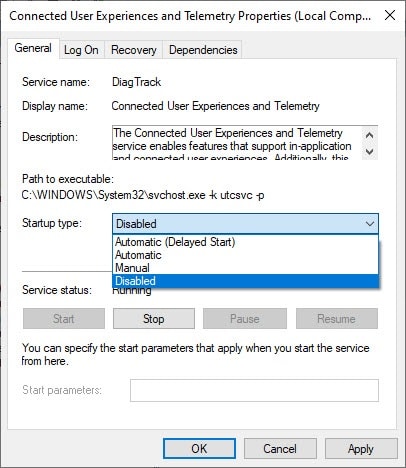
- Click on Apply and OK to save the changes.
- Repeat the 9th 10th and 11th step with the Diagnostics Tracking Service.
- Finally, restart your computer.
Method 4: Disable From The Local Policy Editor
This final method will only work for Windows 10 Pro and Enterprise users. You can use the Local Policy Editor to stop the police that is linked with Data Collection and Preview Builds. To do it, follow the steps given below:
- Open the Run utility again.
- Type gpedit.msc and press Enter to open the Local Policy Editor.
- Next, navigate to the following location:
Computer Configuration -> Administrative Templates -> Windows Components -> Data Collection and Preview Builds - Locate and double-click on the Allow telemetry option.
- Change the status of Allow telemetry to Disabled.
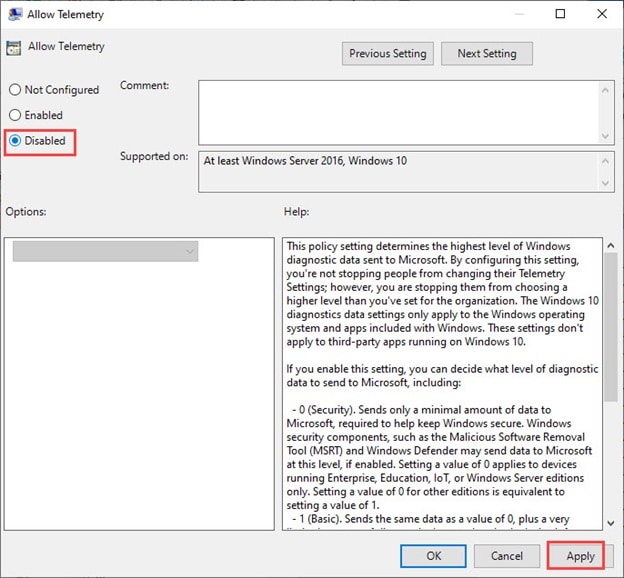
- Click on Apply and OK to save the changes.
- Finally, close the Local Group Policy Editor and restart your computer.
This method will disable Windows 10 telemetry.
Wrapping Up
There you have it, now you know how to disable telemetry on Windows 10. Execute the above methods before carefully reading the repercussions of those methods. If you have any questions related to this article, ask them in the comment section below.
Leave a Reply