The Sync Center in Windows 10 is an amazing feature that can synchronize locally stored files with files stored on network servers. This allows users to take their files anywhere without worrying about unstable network connections. These synchronized files that can be stored on your computer are called offline files.
In this article, I have discussed how you can enable or disable offline files in Windows 10.
What Is The Use Of Windows 10 Offline Files?
Contents
Offline files in Windows 10 are the locally stored files that are synced with your files in the Network servers. As the files can be accessed when the network is disconnected or the server is unstable, they are named as offline files. These files get updated whenever your computer connects to the network.
How To Enable Offline Files Windows 10?
In Windows 10, offline files can be enabled using two methods. One is using the Control Panel and the other one is by using the Registry editor. Here is how you can enable offline files on Windows 10 using these 2 methods.
Enable Offline Files In Window 10 Using Control Panel
To enable offline files from the Control Panel, follow the steps given below:
- Type Control Panel in the search bar and select the appropriate option.
- After the Control Panel opens on your screen, click on the View By option and select Large Icons.
- Find the Sync Center option and click on it.
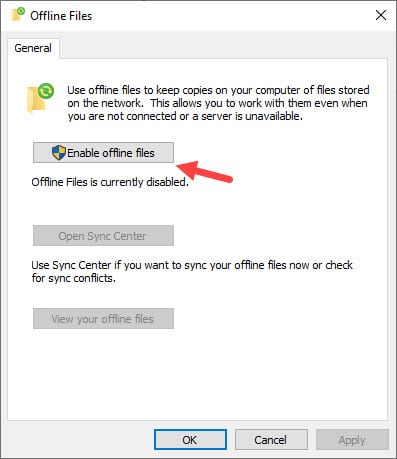
- Now, select the Manage offline files option, located on the left panel. The Offline Files dialog will open on your screen.
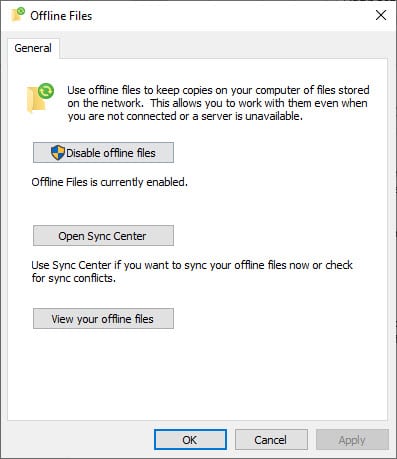
- Select the Enable offline files option. You may see Disable offline files option in its place. This will mean that Windows 10 offline files are already enabled on your PC.
If a confirmation prompt appears, then click on Yes.

- Finally, click on Apply and OK to save the changes and restart the PC.
Enable Offline Files In Window 10 Using Registry Editor
Another way to enable offline files on Windows 10 is by using the Registry Editor. All the Windows settings are stored in Registry, so you must be careful while using the Registry Editor. Follow the steps below exactly to avoid making any mistakes in the Registry.
- Press the Windows + R keys to open the Run utility.
- Type regedit and press Enter to open the Registry Editor.
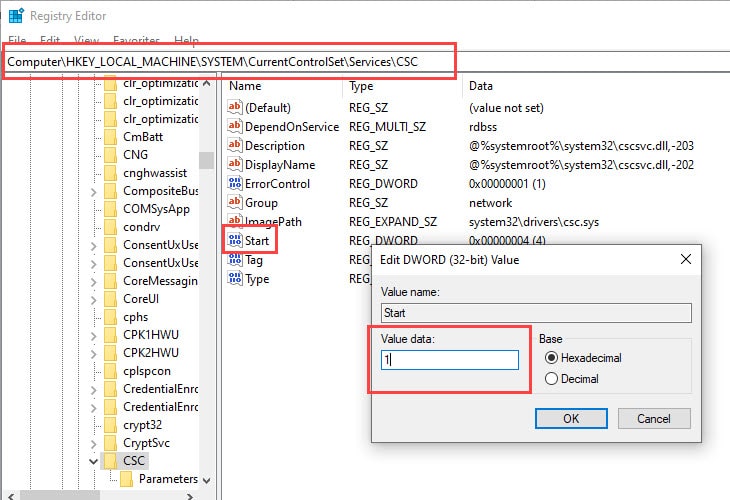
- Navigate to the following Registry key:
Computer\HKEY_LOCAL_MACHINE\SYSTEM\CurrentControlSet\Services\CSC - Right-click on the white part in the right pane and select New> DWORD (32-bit) from the pop-up menu.
- Name the DWORD as Start and double-click on it.
- Change the value to 1 and click on OK.

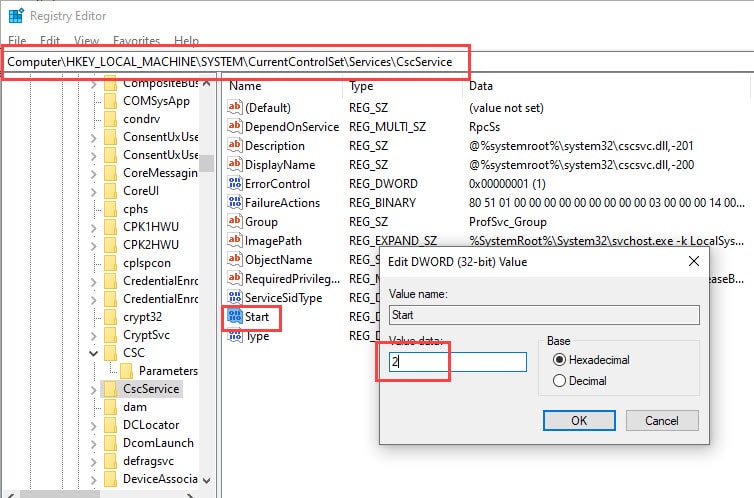
- Now, navigate to the following Registry key:
Computer\HKEY_LOCAL_MACHINE\SYSTEM\CurrentControlSet\Services\CscService - Create another Start DWORD just like above and enter the value as 2. This will enable the offline files on Windows 10.

How To Disable Offline Files In Windows 10?
To disable the offline files on Windows 10, you can use the same methods as given above for enabling it with just some minute changes.
To disable Windows 10 offline files using Control Panel, simply open the Offline files dialog again and click on the disable offline files option. If you see the Enable offline file option in its place, it means that the offline files are already disabled.

To disable offline files from Registry Editor, simply change the value of the Start DWORD to 4 in the CscService key (steps 7 and 8).
Wrapping Up
So, there you have it. Now you know how to enable or disable offline files in Windows 10. If you have any questions regarding the Sync Center and offline files, ask them in the comment section below.
Leave a Reply