Wireless internet connection has made it easy to access the internet. In the current time, users no longer need to connect with an ethernet cable for accessing the internet. Modems and routers have made it much easier to connect to the internet while being comfortable and not worry about wires.
In Windows 10, you no longer need to buy a modem or router to access wireless internet. Rather than buying a new router or modem, you can use the Windows 10 hotspot settings to use laptop as router in Windows 10. In this article, I have discussed how you can enable the Windows 10 Wi-Fi hotspot and turn your desktop or laptop into a router.
How To Enable Windows 10 Hotspot?
Contents
A hotspot is basically a location where the internet can be accessed using Wi-Fi or WLAN (wireless local area network). You may have heard of the term mobile hotspot or portable hotspot; it means a hotspot that can be moved around.
In Windows 10, you can create a mobile hotspot on your laptop or desktop and use it to share the internet. Here I have discussed how you can set up the Windows 10 Wi-Fi hotspot in your PC.
Method 1: Turn Hotspot On From The Settings App
This is the easiest method to enable hotspot in Windows 10. Follow the steps given below to do it:
- Type Settings in the Windows search bar and select the top result.
- Click on the Network and Internet option, and then select the Mobile hotspot option.
- Turn on the Share my Internet connection with other devices toggle to enable the mobile hotspot. Now you can use laptop as router in Windows 10.
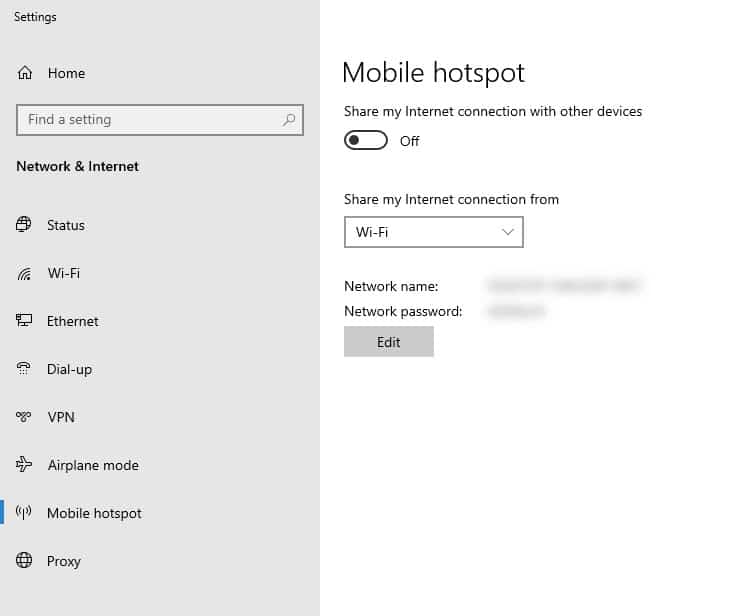
Just enabling the hotspot isn’t enough as it is unprotected. You need to change the mobile hotspot settings and set a password.
The first change you need to do is check the Wi-Fi circle in the Share my connection over section. This will make Windows share the internet over Wi-Fi rather than Bluetooth, which is extremely slow.
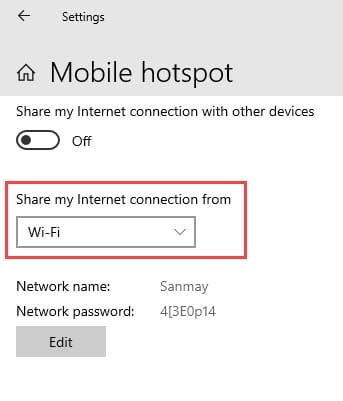
After that click on the Edit option to edit the network info. Write the Network name (the name that will show up as the hotspot for other devices) and enter a strong password. Remember that if you use a weak password, unwanted people can connect with your hotspot.
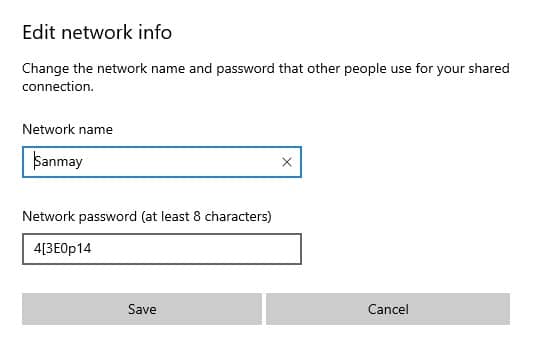
So, choose the password wisely. You can always change it from here. Once done, click on Save to save the changes.
Method 2: Use 3rd Party Software
Other than using the Windows 10 settings to enable the hotspot, you can also use 3rd party software, like Virtual Router Manager or Connectify Hotspot and enable the Windows 10 Wi-Fi hotspot. Both mentioned tools are quite popular. To use the Virtual Router Manager, follow the steps given below:
- Click on this link and download the Virtual Router Manager.
- After you have downloaded the Virtual Router Manager, navigate to the downloaded installer file and right-click on it.
- Select the Run as administrator from the right-click context menu.
- Follow the on-screen instructions to complete the process.
- After Virtual Router Manager has installed, restart your PC.
- When the PC boots into the desktop, run the Virtual Router Manager.
- Enter the name of the connection, set a strong password, and select the shared connection source.
- Now, click on the Start Virtual Router option to turn on the hotspot.
What To Do If The Windows 10 Hotspot Is Not Working?
There is a possibility that you face the “We can’t set up a mobile hotspot. Turn on Wi-Fi” or other similar error when you try to enable the Windows 10 Wi-Fi hotspot. If this occurs, simply follow the troubleshooting procedures given below to fix it.
Solution 1: Check Your Internet Connection
The first thing you should check in this situation is your internet connection. If you are not connected to the internet, then whatever you may try, you cannot enable the hotspot. The prerequisite to enable the Windows 10 Wi-Fi hotspot is to first connect to the internet.
Check if your internet connection is working correctly. Conduct a speed test by clicking on this link and check whether your internet speed is slow or not. If your PC is not connecting to the internet, then call your ISP (internet service provider) and report the issue.
Solution 2: Run Internet Connections Troubleshooter
Windows 10 has an inbuilt Internet Connections troubleshooter that you can run to get further insight into the issue. After you have run the troubleshooter, Windows may automatically fix the problem.
To run the Internet Connection troubleshooter, follow the steps given below:
- Type Troubleshoot Settings in the search bar and select the top option.
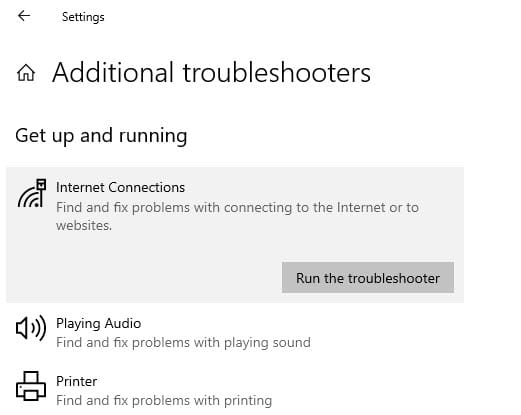
- Next, select the Additional Troubleshooters option.
- Click on the Internet Connections option and select the Run the troubleshooter option.
- Follow the on-screen instructions to complete the process.
Solution 3: Enable Network Sharing
Installing new software or updating your Windows can sometimes change the settings of your computer. If for some reason, the network sharing feature is disabled on Windows, then Windows 10 hotspot won’t work. To enable the Network Sharing, follow the steps given below:
- Open the Mobile Hotspot settings again.
- Click on Change adapter options in the Related Settings section.
- Locate the Mobile hotspot adapter and right-click on it.
- Select the Properties option from the pop-up menu.
- Click on the Sharing tab and check the Allow other network users to connect through this computer’s internet connection box.
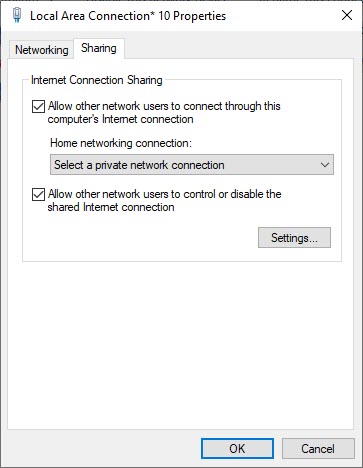
- Select OK to save the changes.
Wrapping Up
So, there you have it. Now you know how to enable Windows 10 hotspot or in other words, how to use your PC as a hotspot. You can also use the troubleshooting methods given in the latter part of the article if the Windows 10 Wi-Fi hotspot doesn’t work. If you have any questions related to this topic, ask them in the comment section below.
Leave a Reply