Windows 10 has a feature that allows it to read the texts on the screen. This feature is known as the Windows Narrator. It is basically a text-to-speak tool that reads the elements on your screen out loud. This tool can read aloud text documents to a web page. It also speaks aloud the actions that you are performing.
This feature was introduced to help visually impaired users to help them have a better experience. In this article, we have discussed how to make Narrator read highlighted text on Windows 10.
Also, check out this article to know how to change monitor refresh rate.
How To Enable The Narrator?
Contents
Before you learn how to use the Narrator to read the selected text, you need to enable it first. To enable the Windows Narrator, follow the steps given below:
- Press the Windows key and type Settings in the search bar.
- Select the top option to open the Settings app.
- After the Settings app opens, click on the Ease of Access option.
- Next, locate and select the Narrator option.
- Finally, turn on the toggle in the Use Narrator section to enable the Windows Narrator.
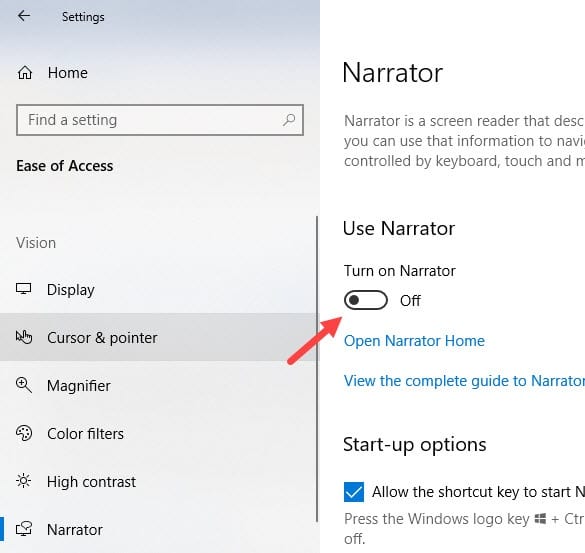
- A dialog will appear on your screen to inform you that the keyboard layout has been changed so that you get a better experience as a screen reader.
- Check the Don’t show again box and click on OK.
How To Make Narrator Read Highlighted Text Windows 10?
Now that you have enabled the Narrator, how to make the narrator read the selected text? Or in other words, how does it work? To use the Narrator for reading texts, simply move the mouse pointer over to the page that you want to be read and select it to make the Narrator start reading. To stop the Narrator, simply press the Ctrl key. Restart the Narrator by pressing the Caps Lock + R keys.
To read text using the Narrator you can use the following shortcuts:
- Caps Lock + T = Read the window title
- Caps Lock + W = Read the whole window
- Caps Lock + Tab = Read the current item
- Caps Lock + R = Read the are where the Narrator cursor is focused
- Caps Lock + Ctrl + R = Read from the beginning of the document
Read text by line
- Caps Lock + I = Read the current line
- Caps Lock + O = Read the next line
- Caps Lock + U = Read the previous line
Read text page by page
- Caps Lock + Ctrl + I = Read the current page.
- Caps Lock + Ctrl + O = Read the next page
- Caps Lock + Ctrl + U = Read the previous page
Read text by paragraph
- Caps Lock + Ctrl + K = Read the current paragraph
- Caps Lock + Ctrl + J = Read the previous paragraph
- Caps Lock + Ctrl + K = Read the next paragraph
Read text by word
- Caps Lock + K = Read the current word
- Caps Lock + L = Read the next word
- Caps Lock + J = Read the previous word
Read text by sentence
- Caps Lock + Ctrl + Period(.) = Read the next sentence
- Caps Lock + Ctrl + Comma(,) = Read the current sentence
- Caps Lock + Ctrl + M = Read the previous sentence
Visit the reading Narrator guide on Microsoft’s official site to learn all the other keys for using the Narrator.
Figuring Out The Narrator Settings
After enabling the Narrator, to fully make use of it you need to understand its settings. We have given a little guide to help you understand some of its settings.
1) Open Narrator Home
After clicking on this option, the Welcome to Narrator screen will open. Here you can learn how to use the Narrator feature fully.
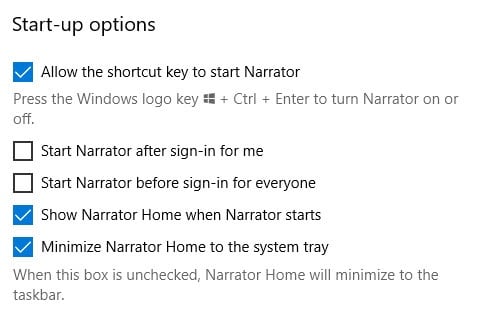
2) Start-Up Options
In the Start-Up options section, you will find the options to decide how or when to open the Narrator app. You can decide if the Windows shortcut Windows + Ctrl + Enter key will turn on the Narrator or not, also whether to start it before you sign-in or after you sign in. You can also decide whether to show the Narrator Home when it starts or whether to minimize the Narrator Home to the System tray.
3) Personalize Narrator’s Voice
Here you can select which voice of the Narrator you want to hear. There are 5 different voice options by default, but you can also add more of them. You can also change the speed of the voice, voice pitch, and voice volume.
Another thing you can do here is to decide whether to lower other apps’ volume when the Narrator is speaking.

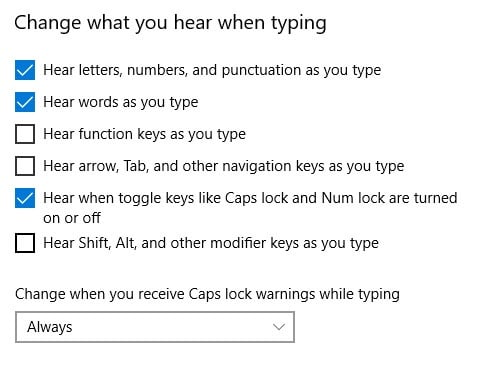
4) Change What You Hear When Typing
This is the setting where you can decide what the Narrator reads aloud while you are writing. You can make the Narrator read, words, letters, numbers, punctuation, function keys, and navigation keys when you type.
5) Choose Keyboard Settings
Here you can decide, which keyboard layout you want to use. Learn about the layouts by clicking on the Learn about the different Narrator keyboard layouts option. You can further select whether to use Caps Lock or Insert key as the main Narrator key.
You can also create your unique keyboard commands from this section of the settings.
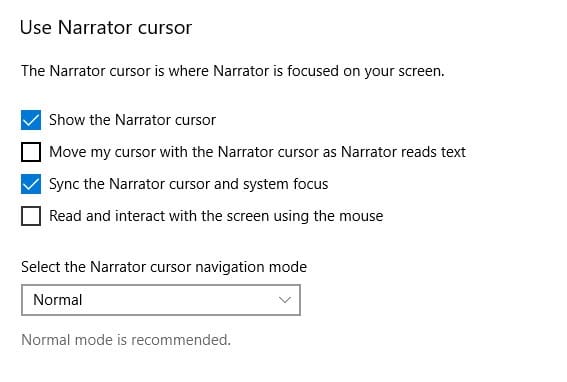
6) Use Narrator Cursor
This is an important part of the Narrator settings. Here you can decide how to use Navigate in a sentence. You can set the Narrator cursor to move with your cursor (remember the Narrator only reads the words in the Narrator cursor) or sync it with system focus. You can also change the settings to read and interact with the screen using the mouse.
These are all the main settings that you should know about, however, there are also some other settings that you can check out by yourself.
Wrapping Up
So, there you have it. Now you know how to make Narrator read highlighted text in Windows 10. If you have any further questions, then ask them in the comment section below.
Because of vision problems I need to use Narrator. However, my problem with it is that it reads everything the cursor crosses. What I would like is for it to read from the cursor point to the end of a paragraph or line upon some command then stop and do nothing else until commanded to do so again Other problems are that it often stops on linked text and text that changes size. Is there some way to make it just read the selected text? Thanks
no