MoUSO Core Worker Process consuming high resources? Some users have reported the MoUSO Core Worker Process causing high memory (RAM) usage and slowing down their PCs.
The MoUSO Core Worker Process is also known as MoUSOWorker.exe and is responsible for handling the updates for the Windows OS.
If you want to know what it is and how to disable it, read the entire write-up because here, we have covered everything you need to know.
Also Read: How To Fix WmiPrvSE.exe High CPU Usage
What Is MoUSO Core Worker Process And What Role Does It Play?
Contents
CoreWorker.exe is a Microsoft process that helps the OS or MCWP responsible for processing and managing the input from the pointing devices.
The “USO” in MoUSO stands for “Update Session Orchestrator,” which is the component of the update process that coordinates the downloaded and installed updates.
It helps the operating system to manage the installation of Windows updates.
It is known to manage the update session and resolve the problems that prevent Windows from updating.
Nevertheless, it protects Windows from potential threats while updating.
What Causes The High Use Of Resources By The MoUSO Core Worker Process?
The weird behavior of the MoUSO Core Worker Process is due to other update-related services that can temporarily be bugged.
There is a chance of other highly pending updates where the system is infected with malware that is known to replicate the MoSUO Core Worker process.
High resource usage by a core worker process can take place due to various reasons, and those are:
- Pending updates that were blocked can also interfere with the overall update process
- Windows update is not in the appropriate state
- The MoUSO CoreWorker.exe process that is being used is outdated
- Software bugs or inefficiencies
- Intensive tasks
- External factors
How Can You Fix MoUSO Core Worker Process’s High Disk/CPU Usage?
The MoUSO Core Worker Process starts processing the moment Windows starts searching for an update, but at times, it remains active for a longer period without apparent reason.
This entire process runs in the background and uses many computer resources, leading to slower performance and high disk or CPU usage.
If you are getting high CPU or disk usage by the “MoUSO Core Worker Process,” here are some steps that can be taken to address the issue.
Try the suggested methods for potentially resolving the high memory /CPU/disk usage.
1) Verify The Authenticity Of The Process
The first thing that can be done is to confirm whether the executable file is from Microsoft, not malware that a cybercriminal has forcefully installed.
This authenticity verification process is essential since the hackers are known to use the original names, making identifying those difficult.
Overall, verifying the authenticity of the executable file is essential for protecting against malware, and it also plays a vital role in your computer’s overall stability and performance.
Follow the steps below to verify the authenticity of the executable file:
- First, right-click on the Start button and select Task Manager.

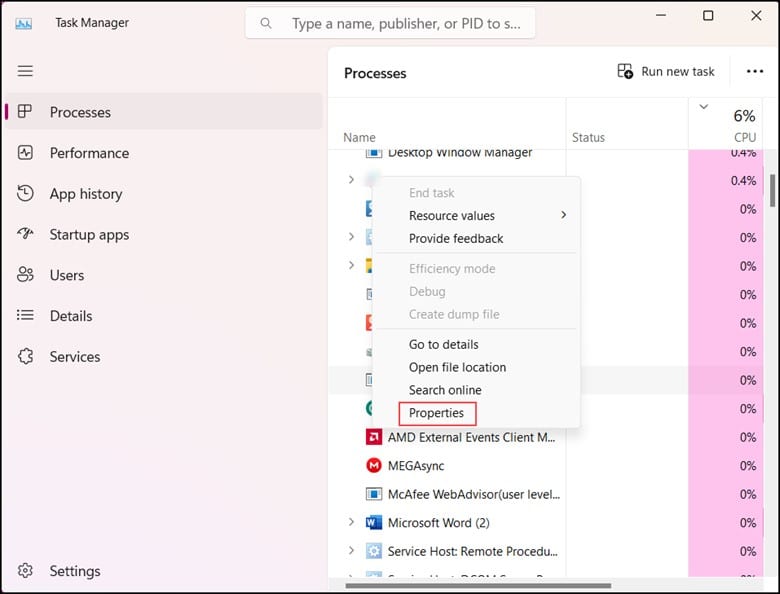
- Next, right-click on MoUSO Core Worker Process and select Properties.
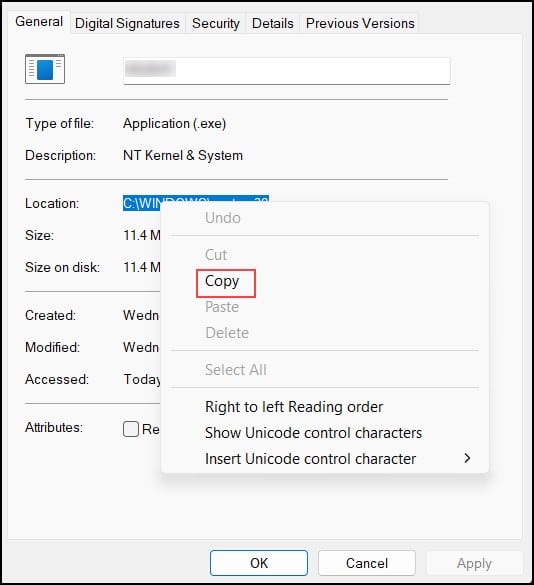
- In the General tab of the Properties window, copy the path near the Location.
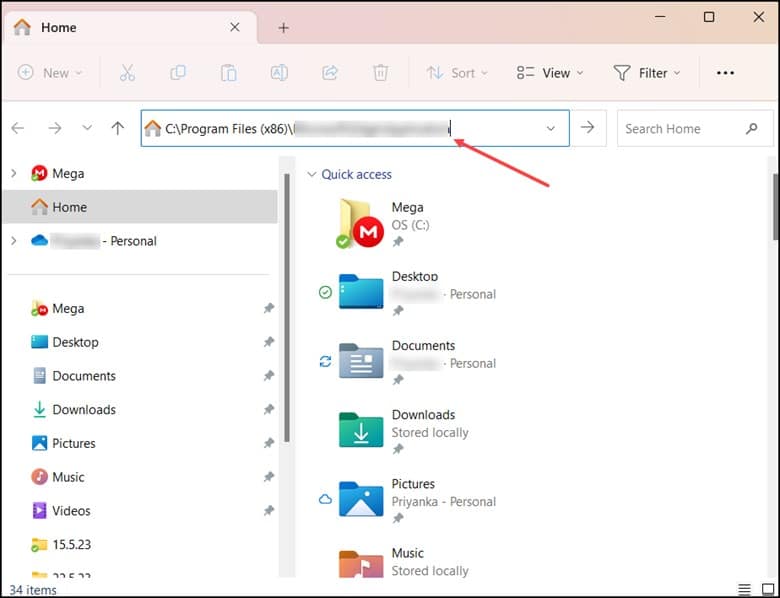
- Next, type File Explorer in the Windows search bar and press Enter.
- Paste the copied path into the File Explorer address bar and hit Enter.
- Look for the executable file and right-click on it and then select Properties.
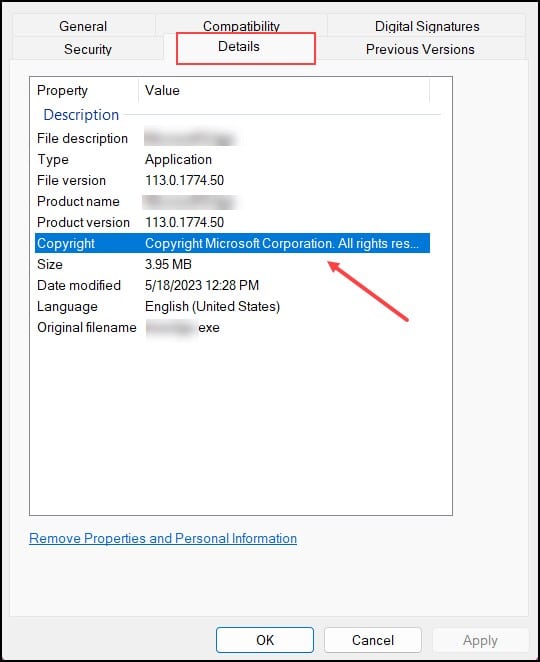
- In the Properties window, navigate to the Details tab.
- Finally, confirm that “Microsoft Corporation. All rights reserved” is written next to Copyright.
2) Run The Windows Update Troubleshooter
Running the Windows Update troubleshooter will help address high disk or CPU usage related to the MoUSO Core Worker Process or any other processes associated with Windows updates.
It is a built-in tool designed to identify and resolve common issues that can prevent Windows updates from installing or functioning correctly.
It is recommended to run the troubleshooter and see if it helps in identifying or fixing the problems and can also fix the high resource consumption.
Follow these steps to run the troubleshooter:
- Right-click on the Windows Start button to select Settings.

- In the Settings window, select the “System” category.
- On the left, click on the “Troubleshoot” option.
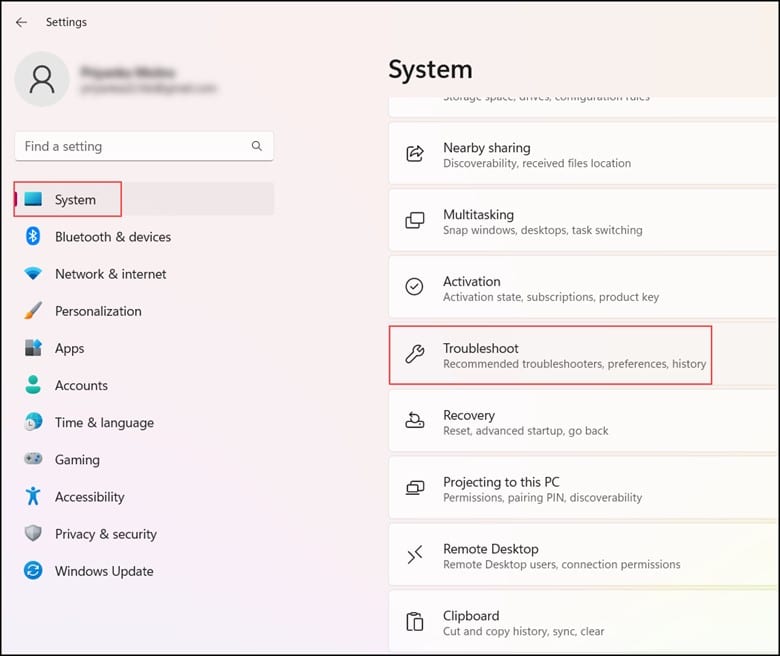
- Scroll down and click on the “Other Troubleshooters” option.

- Search for the Windows Update troubleshooter and click on “Run.”
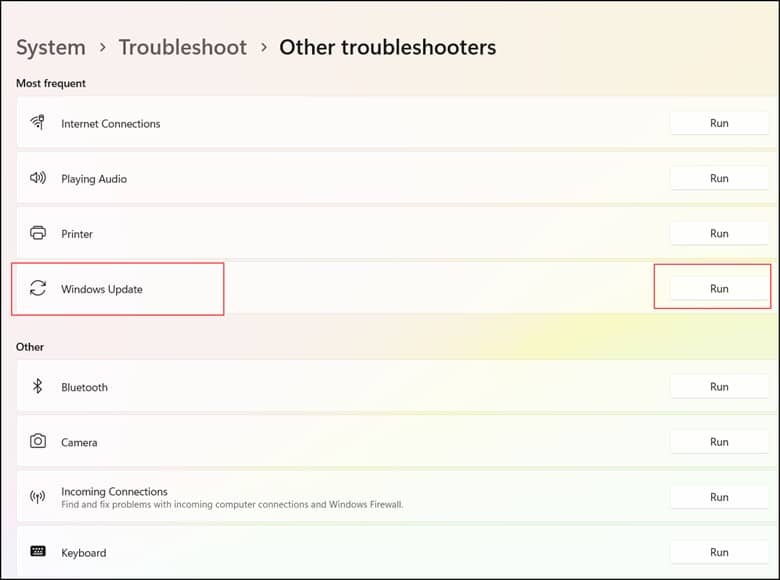
- Follow the onscreen instructions to complete the troubleshooting process.
- Restart your computer after the troubleshooter has completed its task.
3) Restart The MoUSO Process
Restarting the MoSUO process helps resolve the common issues related to Windows updates.
Doing this will help clear the temporary issues or glitches affecting its functionality.
But after getting restarted automatically, if it is not being stopped or terminated, it can interfere with the proper functioning of Windows update.
Follow the steps to restart the MoUSO process:
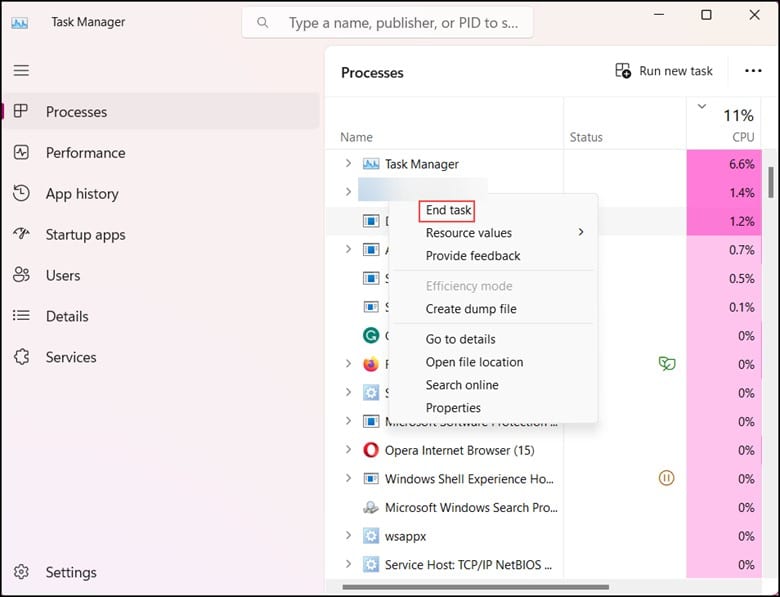
- Right-click on the Windows Start Menu & open Task Manager.

- Then, right-click on the MoUSO Core Worker Process and then click on End Task.
4) Restart The Windows Update Service
Restarting the Windows Update service can help in resolving issues related to high disk or CPU usage that is caused by the MoUSO Core Worker Process or other processes that are associated with Windows updates.
The Windows Update service manages the installation, downloading, and configuration of Windows updates.
Restarting the service can help reset its state and resolve any temporary issues or conflicts impacting its functionality.
This is how you can restart the Windows Update Service:
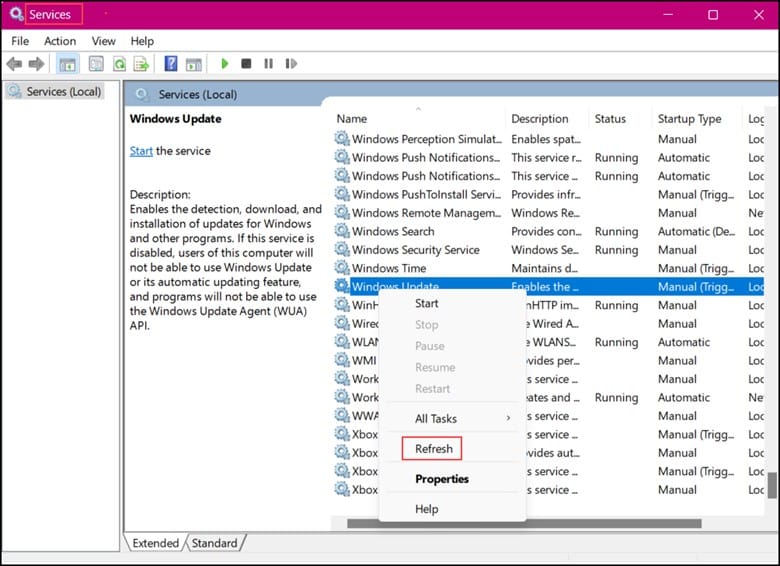
- Press the Windows + R keys on your keyboard to open the Run utility.
- Next, type “services.msc” and hit the OK button.

- After you perform the above steps, it will automatically launch the Services in a different window.
- Scroll down until you come across the Windows Update in the list of services.
- Right-click on it and then select Refresh from the context menu.
5) Install The Latest Windows Update
Installing the latest Windows update can address the high disk or CPU usage related to the MoUSE Core Worker Process or other processes that are associated with Windows.
By regularly installing the latest Windows updates, you can take advantage of Microsoft’s improvements and optimizations.
This can help address high resource usage issues and improve your system’s performance and stability.
This is how you can install the latest Windows Updates:
- Right-click on the Start button & select Settings.
- Then, select the “Windows Update” panel and click “Check for updates.”
- If Windows has already checked for updates, select the Install Now option.
- Finally, Restart Now if prompted.

6) Pause Windows Update
You can also pause Windows updates to fix the high CPU usage.
Pausing Windows updates temporarily suspends the installation of new updates, which can help to alleviate the strain on your system resources and reduce resource consumption.
But remember to resume Windows updates after the desired pause period to ensure your system remains updated.
This is how the Windows updates can be paused:
- First, open Settings after right-clicking on the Start button.
- Then, go to the Windows Update panel, and under More options, open the Pause updates.

- Select Pause for 5 weeks and then click on “Resume updates” at a later date.
7) Disable The Update Orchestrator Service
The update orchestrator service manages and coordinates the various aspects of Windows updates, like the MoUSO core worker process.
It also helps to schedule and coordinate the timings of the updates.
Here is how it can be disabled:
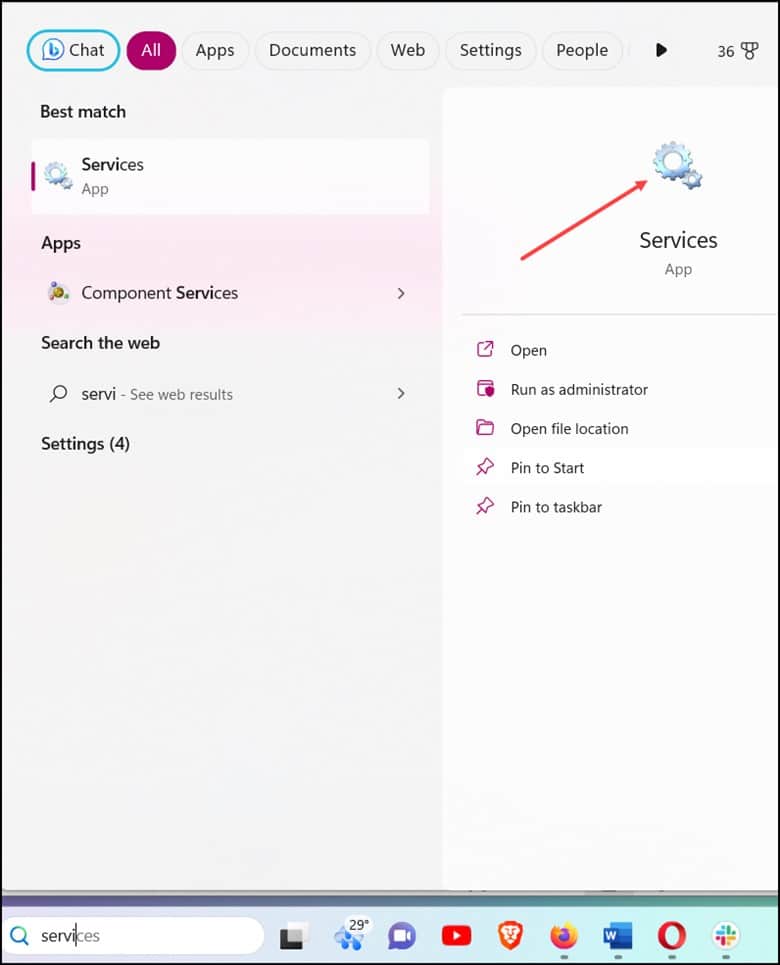
- Type “Services” in the Windows Search button and select the first option.
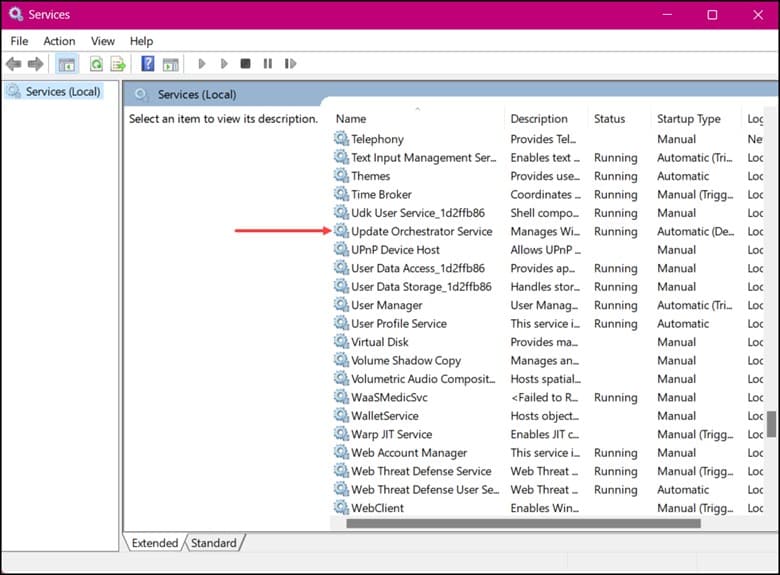
- Look for the “Update Orchestrator Service.”
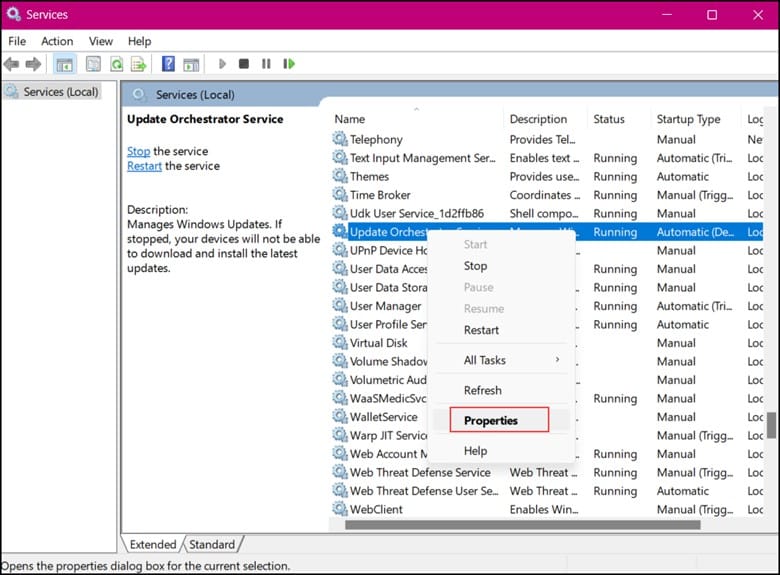
- Next, right-click on it and select Properties.
- Select “Disabled” from the dropdown menu on the General tab.
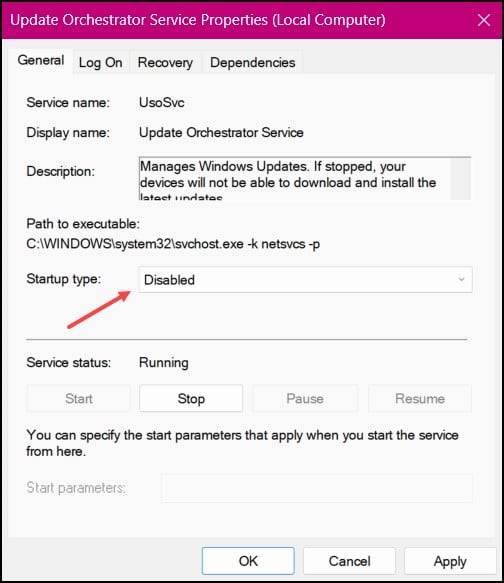
- Once done, click on Apply, followed by OK.
Wrapping Up
Let the MoUSO core worker process work diligently in the background of your Windows, ensuring you the latest advancements that Windows offers.
But if you are still having trouble fixing the MoUSO Core worker process’s high disk or CPU usage, write to us in the reply section below.
We will provide you with further assistance.
Leave a Reply