Cannot hear any audio while using the Nvidia High Definition Audio driver? Well, you are not the only one. Nvidia audio drivers seem to not work for many users when streaming with an HDMI connection. Many have reported that the audio stops after a Windows or a driver update, while for some others the audio simply stops after playing for some time, without any warning or error.
This is a frustrating issue and has been around for a long time. In this article, I have discussed what to do when Nvidia High Definition Audio driver is not working.
Also checkout:
- Nvidia GeForce Experience Not Working – How To Fix?
- 5 Best Nvidia Shield Emulators For Playing Retro Games On Nvidia Shield TV
Why Nvidia Audio Not Working?
Contents
The Nvidia High Definition Audio no sound issue can be triggered by various things. Here are some of the potential causes of this issue:
- The Audio Playback Device Is Not Selected Correctly: The audio playback device can be selected incorrectly, which means that the audio device you use won’t play any sound.
- Outdated or corrupted driver: The most probable cause of this issue is faulty audio driver. If the Nvidia High Definition Audio driver is corrupted, then the user will face various sound-related issues, including sound not playing at all.
- Onboard sound is disabled in BIOS: If the onboard sound is disabled in BIOS, either by a driver update or done unknowingly, then audio won’t play on your PC.
- Faulty System update: Some users have reported that this issue was triggered after they updated Windows. If yours is a similar case, then the Windows update can be corrupted, which is likely the instigator of Nvidia audio not working
How To Fix The Nvidia High Definition Audio Driver Not Working Issue?
Now that you know the causes of this issue, it is time to troubleshoot it. Here I have provided the troubleshooting procedure that you should follow to fix this issue.
Solution 1: Select The Correct Audio Playback Device
One of the common mistakes that many make is selecting the wrong audio playback device. If the wrong audio playback device is selected, then sound won’t play on your PC. To select the correct audio playback device, follow the steps given below:
- Type Control Panel in the Windows search menu and select the top result.
- After the control panel opens, change the View by option to Large icons.
- Now, locate the Sound option and click on it. The Sound prompt will appear on your screen.
- Select the Playback tab and locate the Audio playback device.
- Right-click on it and select the Enable option. If the Disable option is available rather than the Enable option, then skip to step 6.
- Now, right-click on the playback device again and select the Set as Default Device and then Select as Default Communication Device.
- Click on Apply and OK to save the changes.
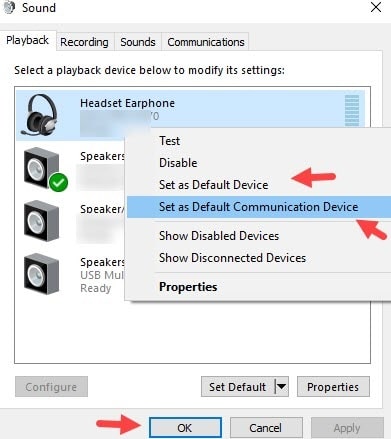
After you have selected the correct audio playback device, the audio should start playing again. If the correct audio device was already selected, then skip to the next solution.
Solution 2: Run Audio Troubleshooter
Whenever you face any issue with the playback audio in Windows 10, one of the first things you must do is run the audio troubleshooter tool. Windows 10 has an inbuilt audio troubleshooter that checks the system for any audio-related issues and then tries to fix it. To run the audio troubleshooter, follow the steps given below:
- Press the Windows + I keys to open the Settings app.
- Click on the Update & Security option and then select the Troubleshoot option.
- In the Get up and running section, select the Playing Audio option.
- Click on the Run the troubleshooter option.
- Follow the on-screen instructions to complete the process. Wait for the troubleshooter to finish checking for the issue.
- If the Apply Fix option appears after the troubleshooter finishes scanning, then click on it.
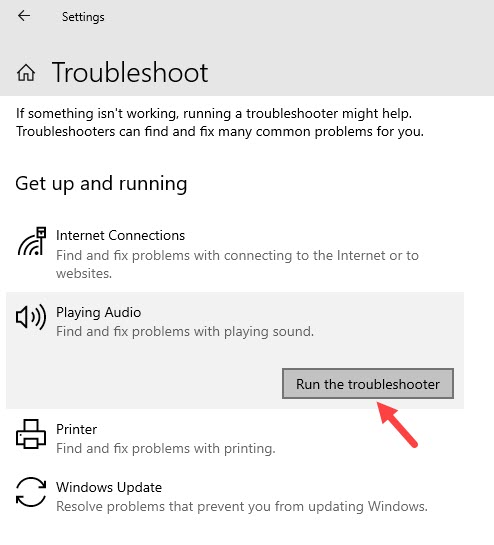
Running the Audio troubleshooter will at least give you more information on the cause of this no sound issue, if it is unable to fix it.
Solution 3: Troubleshoot The Nvidia High Definition Audio Driver
The next thing you can do is to troubleshoot the Nvidia audio driver manually. There is a big possibility that this issue stems from a corrupted or faulty driver. The first thing you can do is to update the driver. If you have recently updated the audio driver and since then this issue has started, then you can try rollbacking the driver version. Finally, if both updating and rollbacking don’t work, then reinstall the audio drivers.
To update the audio driver, follow the steps given below:
- Press the Windows + R keys to open the Run utility.
- Type devmgmt.msc and press Enter to open the Device Manager.
- Expand the Sound, video and game controllers option and right-click on the Nvidia audio driver.
- Select the Update Driver option from the right-click context menu.
- Click on the Search automatically for updated driver software option.
- Follow the on-screen instructions to complete the update.
- Restart your PC.
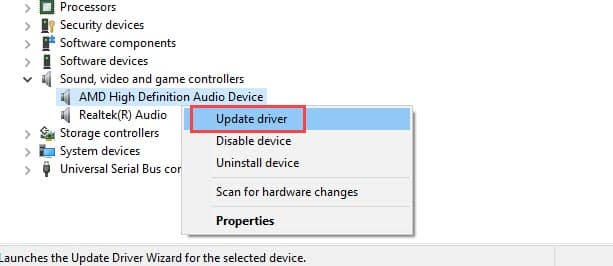
To roll back to a previous version of the Nvidia Audio driver, follow the steps given below:
- Press the Windows + R keys to open the Run utility.
- Type devmgmt.msc and press Enter to open the Device Manager.
- Expand the Sound, video and game controllers option and right-click on the Nvidia audio driver.
- Select the Properties option. The properties prompt will appear on the screen.
- Click on the Roll Back Driver option.
- Follow the on-screen instructions to complete the process.
- Restart your PC.
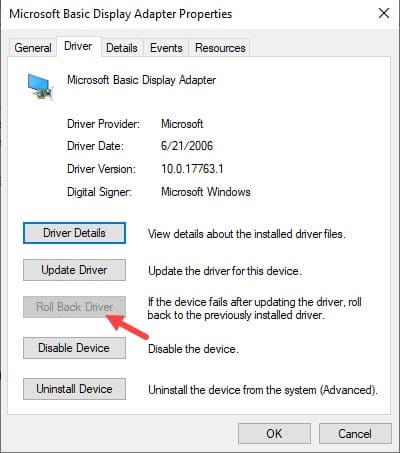
Now, if updating or rollbacking doesn’t work, then try reinstalling the driver. To reinstall the driver, follow the steps given below:
- Press the Windows + R keys to open the Run utility.
- Type devmgmt.msc and press Enter to open the Device Manager.
- Expand the Sound, video and game controllers option and right-click on the Nvidia audio driver.
- Select the Uninstall Device option.
- Follow the on-screen instructions to complete the process.
- Visit Nvidia’s Official website and download the audio driver. You can also use the GeForce Experience application to download and install it.
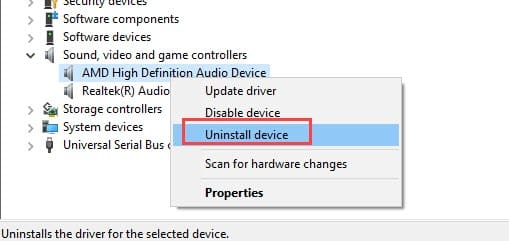
After reinstalling the audio driver, Nvidia High Definition Audio no sound issue should get fixed. However, if still the Nvidia audio is not working, then try the next solution.
Solution 4: Enable Sound From BIOS
Many users have reported that they were unable to hear any sound as the BIOS onboard sound setting was disabled. This can happen after a Windows or driver update, or it may have been disabled unknowingly by the user. Whichever the case, here are the steps to enable it:
(As the BIOS is made differently by each manufacturer, the onboard sound settings will not be located exactly as the steps have mentioned below. However, the steps should guide you enough to reach it.)
- Restart your PC and on the Boot screen press the BIOS key to enter BIOS. The BIOS key should be displayed on the bottom part of the Boot screen.
- After you have entered BIOS, select the Advanced tab or something similar.
- Now, look for an option similar to Onboard Devices Configuration and select it using the arrow keys.
- After opening the Onboard Devices Configuration option, you should be able to locate the Sound settings. The Sound settings can be located under the Audio Controller section or something similar.
- Select the sound settings and Enable it.
- Save the changes and exit BIOS.
- Restart your PC.
After enabling the onboard sound settings from BIOS, the sound should start working again. If the onboard sound settings were already enabled, then skip this solution.
Solution 5: Roll Back To A Previous Windows Version
If you have recently updated your Windows and since then audio is not being played, then try roll backing to the previous Windows update. To do that, follow the steps given below:
- Type Change Advanced Startup Options in the Windows start menu and select the top result.
- Click on the Restart now option in the Advanced startup section. Windows will restart and boot into Repair Options.
- Click on the Troubleshoot option.
- Select the Advanced options.
- Click on the Go back to the previous version of Windows option.
- Follow the on-screen instructions to complete the process.
After the previous Windows version is installed, check if still Nvidia audio is not working.
Solution 6: Try Using Windows Generic Audio Driver
If the above solutions don’t work, try switching to the generic audio driver of Windows. Check if switching to Microsoft’s generic audio driver fixes the sound issue in your PC. To switch the Nvidia audio driver with the generic audio driver of Microsoft’s, follow the steps given below:
- Open Device Manager and expand the Sound, video and game controllers option.
- Right-click on the Nvidia audio driver and select the Update Driver option.
- Select the Browse my computer for driver software option.
- Click on the ‘Let me pick from a list of Available Software’ option.
- Now, from the list of available software, select the High Definition Audio Device option, which is the generic audio driver of Microsoft.
- Click on next and follow the on-screen instructions to complete the process.
- After the switching process is complete, restart your PC.
Now, check if the generic audio driver of Microsoft is facing the same no sound issue as the Nvidia driver.
Wrapping Up
So, there you have it. Now you know what to do when Nvidia High Definition Audio driver no sound issue arises. The above troubleshooting solutions should help you fix this issue. If you have any questions regarding this topic, ask them in the comment section below.
Leave a Reply