2 in 1 Windows devices, like tablets, have become quite popular in recent years. It provides more mobility than a traditional laptop, which is the primary attraction.
Also, the ability to turn the screen and use a portrait or landscape mode anytime is pretty convenient. However, sometimes users prefer to lock the auto-rotation so that the screen doesn’t rotate suddenly when you don’t want it to.
Recently, many users have reported that the rotation lock feature is greyed out, so they can’t enable it. In this article, I have discussed what to do when rotation lock is greyed out in Windows 10.
What To Do When Rotation Lock Greyed Out In Windows 10?
Contents
The rotation lock greying out can be caused by several things. The sensor of the device can malfunction, it can be a simple software bug, or you may have a keyboard connected with the tablet. These are some of the potential causes of this issue.
Now, it is time to troubleshoot the issue. Below I have provided the troubleshooting procedure that you can use in order to fix this issue.
Solution 1: Enable Portrait Mode
The most reported fix for this issue is to enable the Portrait mode in your device. This fix has worked for many users and should also work for you. To do it, follow the steps given below:
- Type Settings in the Windows search bar and select the top option. This will open the Settings app.
- Next, select the System option.
- After that, select the Display option.
- In the Orientation section, select the Portrait option.
- Now your device will automatically switch to portrait mode.
After your device switches to portrait mode, the rotation lock should now become available again.
Solution 2: Reset The Device
The next thing you can try is to reset the device. Resetting helps in fixing many minor bugs and errors. To reset your Surface device, follow the steps given below:
- Turn off the device completely.
- After the device is shut down completely, press and hold the Volume Up button and the Power Button.
- After the device boots, click on the Reset option.
- Save the changes and exit.
After you have reset the device, hopefully, the Windows 10 rotation lock greyed out issue is fixed. If the issue remains, then try the next solution.
Solution 3: Disconnect Keyboard
When the Windows 10 rotation lock is missing, see if you have connected a keyboard to the device. If the keyboard is plugged in, it can interfere with the Rotation lock feature. Remove the keyboard and check whether the rotation lock becomes available or not.
Solution 4: Switch To Tablet Mode
Another thing you can try to fix this issue is to switch to tablet mode. Many users have reported that switching the device to tablet mode can fix the rotation lock greyed out in Windows 10 issue. To enable Tablet mode, follow the steps given below:
- Type Settings in the Windows search bar and select the top option. This will open the Settings app.
- Next, select the System option.
- Choose the Tablet mode option and turn on the Make Windows Touch friendly when using your device as tablet toggle.
- Now you can also decide how your device change after switching to tablet mode. But before that, check whether this fixed the rotation lock greyed out issue.
Solution 5: Tweak Registry
Windows Registry has all the settings of Windows stored in it. There is a way to tweak certain orientation registry keys to potentially fix this issue. However, you need to be extra careful while following these steps as even a small mistake in the Registry can lead to a system crash. First, back up the registry keys, in case anything wrong happens, you will be able to restore them now.
Follow the steps given below to tweak the registry in order to fix this issue:
- Type Run in the Windows start menu and select the top result.
- After Run utility opens, type regedit in the search box and select OK. This will open the Registry Editor.
- Navigate to the following Registry key:
Computer\HKEY_LOCAL_MACHINE\SOFTWARE\Microsoft\Windows\CurrentVersion\AutoRotation - Select the AutoRotation key and locate LastOrientation value in the right-panel.
- Double-click on the LastOrientaton value.
- Change the value to 0 and click on OK to save the changes.
- If you see any value with the name SensorPresent, then also double-click on it and change the value to 1. Click on OK to save the changes.
- Close the Registry.
Check if this fixed the rotation lock missing issue.
Solution 6: Troubleshoot Display Drivers
Another thing that can possibly trigger this issue is corrupted or outdated display drivers. First, update your display drivers, and if that doesn’t work then reinstall them. To update the graphics drivers, follow the steps given below:
- Type Run in the Windows start menu and select the top result.
- After Run utility opens, type devmgmt.msc in the search box and select OK. This will open the Device Manager.
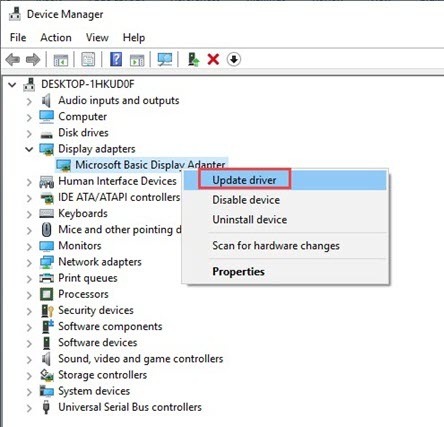
- Expand the Display Adapters option.
- Right-click on the graphics driver and select the Update Driver option.
- Select the Search for updated drivers option.
- Follow the instructions on your screen to complete the process.
- Restart your device.
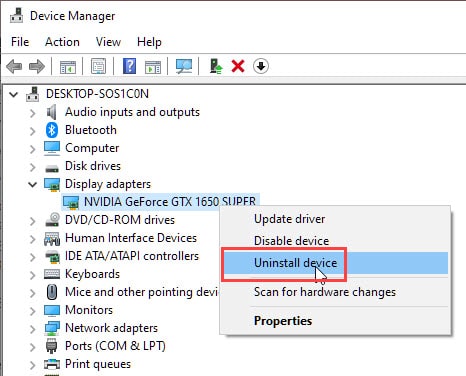
After the device restarts, check if the issue persists. If yes, then try reinstalling the graphics drivers. To reinstall the graphics drivers, follow the steps given below:
- Type Run in the Windows start menu and select the top result.
- After Run utility opens, type devmgmt.msc in the search box and select OK. This will open the Device Manager.
- Expand the Display Adapters option.
- Right-click on the graphics driver and select the Uninstall option.
- Follow the instructions on your screen to complete the process.
- Now, visit the manufacturer’s website and download the required drivers.
- Install them and restart your device.

Solution 7: Check If The Screen Is Allowed To Rotate
You may have disabled the screen rotation feature from the Settings. If the screen doesn’t rotate, then there is no need to lock the rotation. This can be the reason why the rotation lock is greyed out. To enable the screen rotating feature, follow the steps given below:
- Type Settings in the Windows search bar and select the top option. This will open the Settings app.
- Next, select the System option.
- Choose the Display option next.
- On the right-panel, select the Advanced display settings option.
- Now, select the Advanced sizing of text and other items option.
- On the left panel, select the Change Display settings option.
- Check Allow the screen to auto-rotate box.
- Select Apply and OK to save the changes.
- Restart your device.
Solution 8: Restart Sensor Monitoring Service
It is possible that the sensor monitoring service has stopped working and thus triggering this issue. If this is the case, then by restarting the Sensor monitoring service, you can fix this issue. To restart the Sensor monitoring service, follow the steps given below:
- Type Run in the Windows start menu and select the top result.
- After Run utility opens, type services.msc in the search box and select OK. This will open the Services app.
- Locate the Sensor Monitoring service among the other listed services and double-click on it. This will open its Properties dialog.
- Change the Startup Type to Automatic and click on the Start option.
- Click on Apply and OK to save the changes.
Solution 9: Disable YMC Service (For Lenovo Yoga Device Users)
If you are using Lenovo Yoga and facing this issue, then you may be able to fix it by disabling the YMC service. To disable the YMC service, follow the steps given below:
- Type Run in the Windows start menu and select the top result.
- After Run utility opens, type services.msc in the search box and select OK to open the Services app.
- Locate the YMC service and double-click on it.
- Change the Startup Type to Disabled.
- Click on Apply and OK to save the changes.
Solution 10: Update Windows
This issue appeared after a certain Windows update for many users. It is likely that a later version of Windows will have patched this bug. Check if a Windows update is available or not and if yes then update the Windows in your device.
To update Windows 10, follow the steps given below:
- Type Settings in the Windows search bar and select the top option. This will open the Settings app.
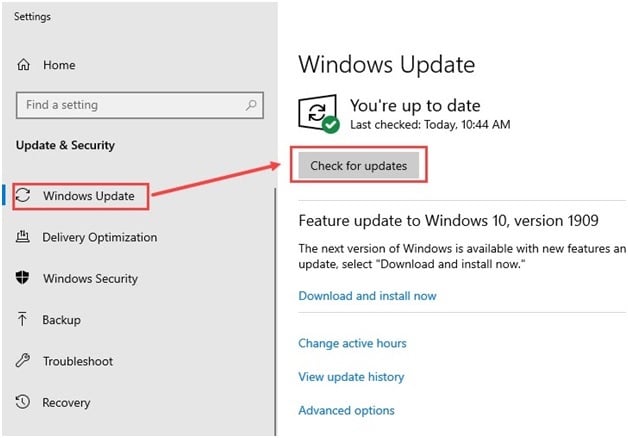
- Select Update & Security option.
- Click on the Windows update option.
- Now, select the Check for updates option.
- Let Windows check whether a new version is available. If yes a new is available, then download and install it.
- Restart your PC to complete the process.

Wrapping Up
So, there you have it. Now you know how to fix the Windows 10 rotation lock greyed out issue. The above solutions should help you fix this issue. If you have any questions regarding this topic, ask them in the comment section.

Leave a Reply