With the advancement of technology, we can experience fast internet and share a large amount of data in a few seconds. The faster your internet is, the more you can access it in lesser time. Even with the fast internet users are benefitting from, we still want it to be faster.
One easy way for increasing your internet speed, either for browsing or network sharing, is a direct connection with an ethernet cable. A wireless network may be more convenient to use, but ethernet still remains the faster alternative.
However, many have reported that Windows 10 has slow network file transfer over ethernet. When your ethernet becomes slower than the wireless network, there definitely needs to be a concern. Here I have discussed what to do when ethernet slower than Wi-Fi in Windows 10 and how to increase ethernet speed.
Also checkout:
Why Ethernet Slower Than Wi-Fi In Windows 10?
Contents
Generally, a direct ethernet connection is always faster than the wireless connection from the same network. If your ethernet connection is slow and the network file transfer is slow over ethernet, it is likely because of the following causes:
- Outdated OS: Are you using a previous version of Windows OS? Updating to the latest version of Windows 10 may fix the slow ethernet connection.
- Corrupted or Outdated Network Adapters: If your network adapters are outdated or corrupted, it can lead to such connectivity issues.
- Type of ethernet cable: There are various types of ethernet cable with ups and downs. If you are using old ethernet cables, it will explain why our network transfer speed is so slow.
- Auto tuning feature is enabled: Many have reported that having the auto-tuning feature enabled can trigger such issues.
- Remote Differential Compression is enabled: Similar to Auto tuning, the Remote Differential Compression feature is also said to cause this issue for some.
- Wrong DNS configuration: Incorrect DNS configuration can also be the cause of slow network transfer over ethernet.
How To Fix Windows 10 Slow Network File Transfer?
Here I have discussed both the troubleshooting methods if you face slow network file transfer from ethernet or wireless networks. Follow the troubleshooting mentioned here to fix the issue.
Solution 1: Reset Router
If you are facing a slow network file transfer issue on a wireless network rather than ethernet, the first thing you can do is reset your router. To reset your router, follow the steps given below:
- Locate the Reset button on your router. If you don’t know where to look, then read the router’s user manual. In the user’s manual, you will find the reset button of your router mentioned.
- After you have found the reset button, press and hold it for 15-20 seconds.
- Leave the button and wait for 10 more seconds.
- Now, press the power button to turn on the router.

After the router resets, check if the network transfer speed is still the same.
Solution 2: Remove Anything That Interferes With The Wi-Fi Signal
If your wireless network transfer speed is still slow, then it can be due to the Wireless signal being interfered with. If any wireless devices are placed near the router, move them away. Nearby wireless devices can cause Electromagnetic interference.
Devices such as the following mentioned can interfere with the wireless signal:
- Microwave ovens
- Cordless phones
- Garage door openers
- Wireless toys
Solution 3: Update Your Windows
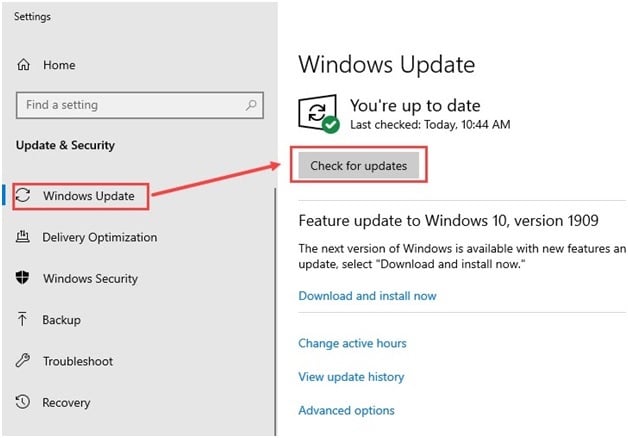
If your Windows is outdated, try updating it to the latest version and see whether still you have a slow ethernet connection. To update your Windows, follow the steps given below:
- Type Check for updates in the Start menu and select the top result.
- Click on the Check for updates option and wait for Windows 10 to finish checking.
- If any update is available, Windows should start downloading it automatically. After the download is complete, install it and restart your PC.

After you have updated to the latest Windows 10 version, check the network transfer speed.
Solution 4: Disable Or Uninstall VPN
Are you using any VPN on your Windows 10 for connecting with the internet? If yes, then it might be the reason why you have a slow ethernet speed. Try disabling and then uninstalling your VPN.
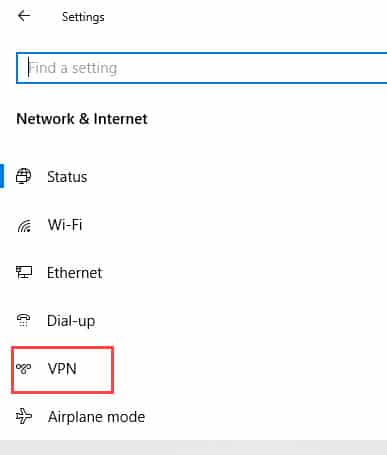
The easiest way to remove VPN is by removing it from the Settings app. It’s easier this way as most users are familiar with the Settings app. To remove the VPN from the Settings app, follow the steps given below:
- Type Settings in the Windows search bar and select the appropriate option.
- Select the Network & Internet option.
- Click on the VPN option on the left panel.

- Now, you will see the name of the connected VPN below the Add a VPN connection option.
- Select the VPN and click on the Remove option.
- A pop-up dialog will open up to have your confirmation to remove the VPN. Click on the Remove option and the VPN will be removed.
If this doesn’t fix the issue, try uninstalling it. To uninstall your VPN, follow the steps given below:
- Press the Windows + R keys to open the Run tool.
- Type appwiz.cpl in the search box and press Enter to open the Programs and Features panel.
- Right-click on the VPN and select the Uninstall option.
- Follow the uninstallation Wizard’s instructions to complete the process.
Solution 5: Disable Windows Auto-Tuning Feature
Many users have reported that disabling the Windows auto-tuning feature fixes the slow network transfer of ethernet cables on Windows 10. To disable the Windows auto-tuning feature, follow the steps given below:
- Open the Run utility again.
- Type cmd and press the Ctrl + Shift + Enter keys to open an elevated Command Prompt.
- Now, type the following command in the command prompt window and press the Enter key to initiate it:
netsh int tcp set global autotuninglevel=disabled - Close the command prompt and check if the network sharing speed increases.
If the network sharing speed remains unchanged, type the following command in an elevated Command Prompt to enable the auto-tuning feature again:
netsh int tcp set global autotuninglevel=normal
Solution 6: Disable Large Send Offload
Disabling large send offload is a known method for increasing network sharing speed. To do it, follow the steps given below:
- Right-click on the Start button and select the Device Manager option.
- Expand the Network adapters option and right-click on the ethernet network driver.
- Select the Properties option and click on the Advanced tab.
- In the Property section, click on the Large Send Offload v2 (IPv4) option, and in the Value section set it to Disabled.
- Click on the Large Send Offload v2 (IPv6) option and also set it to Disabled.
- Select OK to save the changes.
Solution 7: Update Network Drivers
If your network drivers are outdated, try updating them and see whether the still ethernet is slower than Wi-Fi in Windows 10. Here are the steps to update Network Drivers:
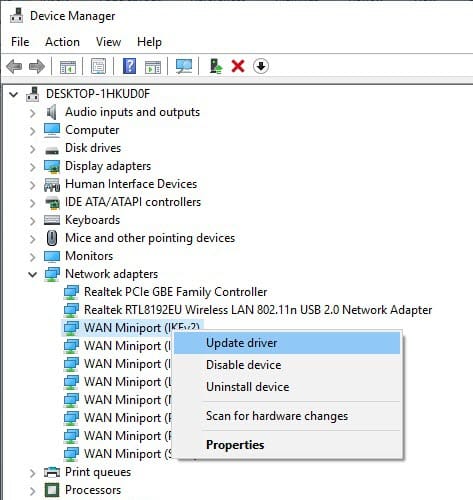
- Open the Device Manager again.
- Expand the Network Adapters.
- Right-click on the ethernet network driver and select the Update Driver option.
- Click on Search automatically for drivers option.
- Follow the on-screen instructions to complete the process.
- Restart your PC.

After the drivers have updated, check if the transfer speed is still slow.
Solution 8: Change Duplex Settings
If none of the above solutions work, try changing the duplex settings. Changing the duplex settings has worked for some regarding this issue. To change the Duplex settings, follow the steps given below:
- Open the Network adapter properties as shown earlier.
- Click on the Advanced tab.
- In the Property section, select the Speed/duplex settings option. Change its value to 100 Mb Full Duplex. Click on OK to save the changes.
Wrapping Up
So, there you have it. Now you know how to fix the Windows 10 slow network file transfer issue. If you have any questions related to this topic, ask them in the comment section below.
Leave a Reply