In Windows 10, every file and folder comes with certain permission requirements for opening, customizing, or deleting it. When you try to edit, open, or delete certain files that you lack permission for access to, you will likely face the “Access Denied” or “You require permission from system” Windows 10 errors.
System files and folders are an example of this. You may also be unable to access old files from other user accounts or files from your old hard drive.
To access such files and folders, you will need to take ownership of it. In this article, I have discussed how to take ownership of Windows 10 files and folders and thus get complete control over Windows 10 directories.
How To Take Ownership Of Windows 10 Files And Folders?
Contents
When you try to access files that your user account lacks permissions for, you will only trigger the require permission from system Windows 10 error. In these situations, you will need to take ownership of Windows 10 inaccessible files and folders. To do that, follow the steps given below:
- Press the Windows + E keys on your keyboard to open the Windows File Explorer.
- Navigate to the file or folder that you are unable to access.
- Right-click on that file or folder and select the Properties option from the right-click context menu.
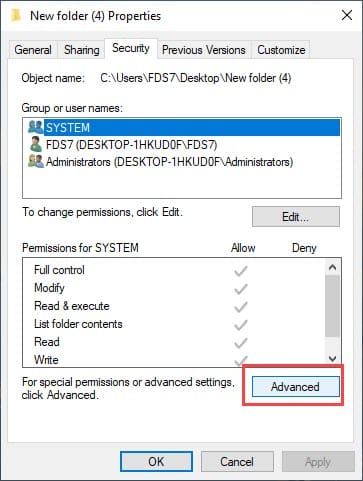
- Select the Security tab and click on the Advanced option. This will open the Advanced Security Settings dialog of the file and folder you want to access.

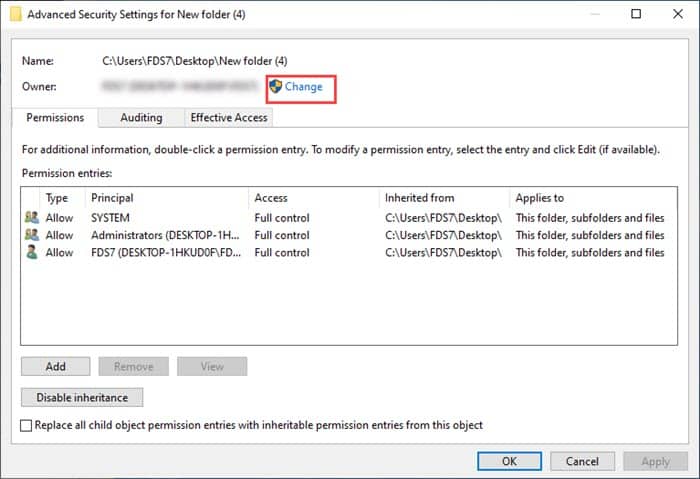
- Beside the Owners, click on the Change option. This will open the Select User or Group dialog.

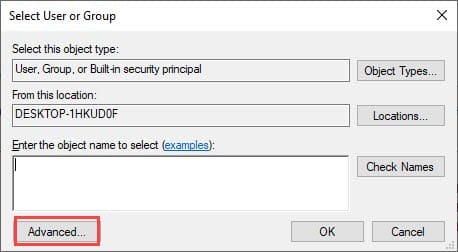
- After that, select the Advanced option.

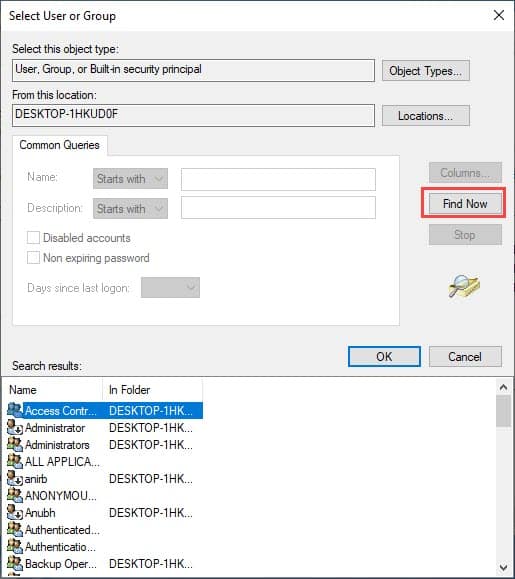
- In the advanced Select User or Group dialog, click on the Find Now option. This will fill the Search result section.

- Locate your account’s username in the Search result and click on it.
- Then, click on OK to select the object. Again, click on OK to confirm the new owner.
- Now, click on Apply and OK in the Advanced Security Settings dialog to save the changes. Click on OK again in the folder properties dialog.
Pro Tip: Check the Replace ownership on sub containers and object box when taking the ownership of a folder, after selecting the new owner at step 9, in the Advanced Security Settings dialog. This will give the owner, or in other words your user account, access over the subfolders inside the folder.
How To Grant Full Access To Your User Account Over The Files And Folders?
After you have completed the above steps, the owner of the file or folder will be changed to your user account. But this doesn’t mean that your account has complete access to the file or folder. To grant full access to your user account, follow the steps given below:
- Open the Advanced Security Settings of the folder again.
- Under the Permission Entries section, click on the Add option.
- Click on the Select a principal option. This will open the Select User or Group dialog.
- Select the Advanced option.
- Click on the Find Now option and select your account’s username from the search result.
- Click on OK and after that click on OK again.
- In the Basic Permissions section, check the Full control box.
- Make sure the Type is set to Allow and Applies to is set to This folder, subfolders, and files.
- Click on OK, then on Apply and OK to save the changes.
- Again, click on OK to close the file or folder properties.
Now, you will have full access to the file or folder. By taking ownership, you can get complete control over Windows 10 directories.
How To Access Files On Old Hard Drive Of Windows 10?
If you have ever tried to access files on your old hard drive in your new PC, you were likely unable to do so. When you try to access files on an older hard drive, you will face permission issues.
This is because the files on your older hard drive are under the ownership of the previous computer’s account. To access them you will have to take ownership of the files.
So, how to access files on old hard drive of Windows 10? Simply connect the hard drive to your PC and take ownership of Windows 10 files as mentioned above. Once you have taken ownership of the files and folders, you will be able to access them again.
How To Add Take Ownership Option To The Right-Click Context Menu?
The above method for taking ownership is a pretty long process. Doing it one or two times can be fine, but what if you need to take ownership of multiple files and folders?
Using the above method each time will become quite taxing. There is an easier and faster alternative that can be used to take ownership of Windows 10 files and folders.
There is a way you can add the Take Ownership option in the right-click context menu. This means that all you will need to do for taking ownership of a file or folder is to right-click on it and select the Take Ownership option from the right-click context menu. This can be done by editing the Registry. Make sure you backup the registry keys before following the steps given below.
Add Take Ownership Option For Files In The Right-Click Context Menu
To add the Take Ownership option for files in the right-click context menu for making it easier to take ownership of Windows 10 files, follow the steps given below:
- Press the Windows + R keys to open the Run utility.
- Type regedit in the search box and press Enter to open the Registry Editor.
- In the Registry Editor, navigate to the following key:
HKEY_CLASSES_ROOT\*\shell - Check if there is a subkey inside the shell key named If no, then right-click on the shell key and select New>>Key to create a new subkey. Name the new key runas.
- Select the runas key and on the right panel double-click on the (Default) value. This will open its properties dialog.
- Type Take Ownership in the Value data Click on OK to save the changes.
- Right-click on the white area and select New>>String Value. Name the string value NoWorkingDirectory.
- Now, right-click on the runas key and select New>>Key to create another subkey. Name this key command.
- Select the command key and on the right-panel double-click on the (Default) value.
- Type the following command in the Value data section:
cmd.exe /c takeown /f \”%1\” && icacls \”%1\” /grant administrators:F - Click on OK to save the changes.
- Right-click on the empty white part and create a new String value like before.
- Name the string value IsolatedCommand and double-click on it.
- Type the following command in the Value data section:
cmd.exe /c takeown /f \”%1\” && icacls \”%1\” /grant administrators:F - Click on OK to save the changes.
Now, you can right-click on any file and you will see the Take Ownership option present in the right-click context menu.
Add Take Ownership Option For Folders In The Right-Click Context Menu
To add the Take Ownership option for folders in the right-click context menu, follow the steps given below:
(Most of the steps are similar to adding the option for files. I will skip the common parts and reference them to the above steps that you need to do)
- Open Registry Editor and navigate to the following key:
HKEY_CLASSES_ROOT\Directory\shell - Follow steps 4-9 as mentioned above in adding this option for files.
- Type the following command in the Value data section:
cmd.exe /c takeown /f \”%1\” /r /d y && icacls \”%1\” /grant administrators:F /t - Click on OK to save the changes.
- Now, create a new string value in the Command key and name it IsolatedCommand. Double-click on it to open it.
- Type the following command in the Value data section:
cmd.exe /c takeown /f \”%1\” /r /d y && icacls \”%1\” /grant administrators:F /t - Click on OK to save the changes.
Now, the Take Ownership option will be added for the right-click context menu of folders also and you will be easily able to take ownership of Windows 10 folders.
Wrapping Up
So, there you have it. Now you know how to take ownership of Windows 10 files and folders. If you have any other questions related to this topic, ask them in the comment section below.
It’s a valuable article for those, who are working in the networking field. Thank you.