Desktop Windows Manager or dwm.exe is responsible for the graphical User Interface of your operating system.
Even though dwm.exe is a critical component in the Windows 11 process but if something is wrong with it, your entire system can crash.
There are a handful of things that can be done to fix the dwm.exe problems, and here are the details.
In the prior Windows version, there was a scope for turning it off, but it isn’t applicable for Windows 11.
Join us as we explore the role of dwm.exe in Windows OS and how to deal with the problems related to it.
Also read: How To Turn On The Automatic Login Feature In Windows 11?
What Is Dwm.exe?
Contents
Dwm.exe is mainly responsible for managing and rendering the GUI elements on your screen. Since it runs in the background, a certain amount of processor gets consumed in the entire process.
Its primary function is to enable visual effects and to provide a composting Windows manager for working along with your graphics card in order to create a smooth and visually appealing user interface.
Overall, it contributes to the sleek and immersive user experience that the operating system has to offer.
Why Dwm.exe Crashes?
Dwm.exe can crash due to various factors, and the most potential reasons for dwm.exe crashing on your Windows 11 PC are listed below:
- Virus or malware
- Hardware malfunction
- Outdated graphics driver
- Conflict or interference with non-Microsoft apps
- Presence of corrupt system files
- The desktop window manager service is disabled
How Can The Dwm.Exe Process Be Fixed In Windows 11?
Read through the tips and tricks to resolve the dwm.exe issue in your Windows 11.
Here are a few of those:
1) Restart Explorer.exe
Restarting explorer.exe will restore the functionality of the GUI and will also resolve the temporary glitches or issues that are likely to be responsible for causing the issue.
It will also refresh the Windows Explorer process and rectify the temporary glitches that are acting as a barrier when it comes to file and folder operations.
Follow the steps for restarting the explorer.exe:
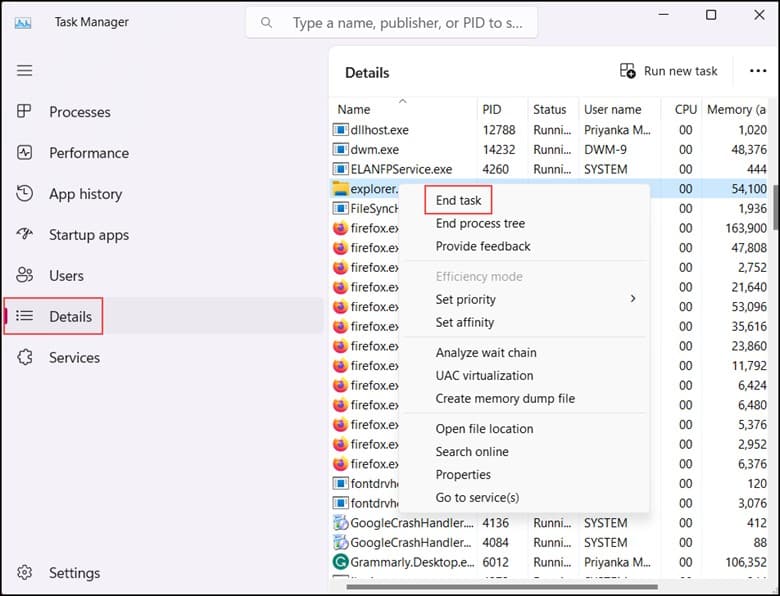
- Right-click on Start and open Task Manager.

- In the Details tab, locate explorer.exe.
- Right-click on it and then choose the “End Task” option.
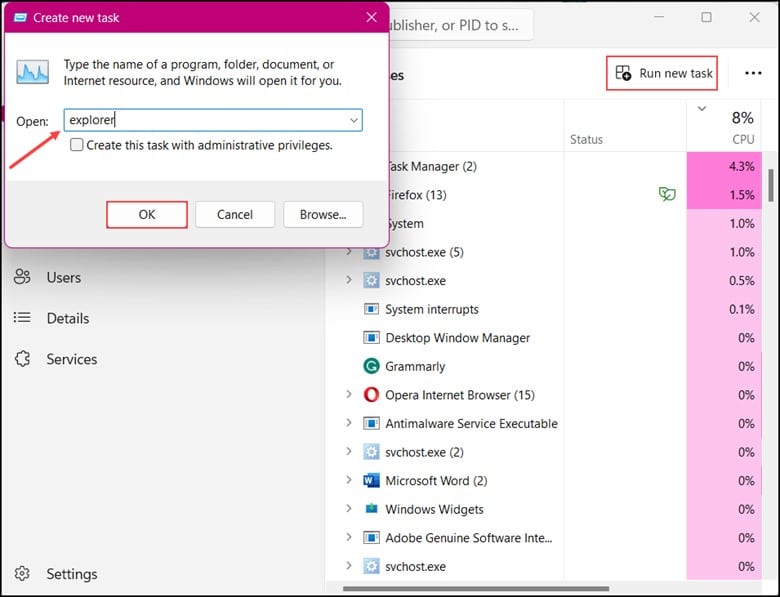
- Next, go to “File” and choose “Run new task.”
- Type “explorer” in the bar and click on “OK.”
If the issue persists, disable the screen saver.
2) Disable The Screensaver
The moment you disable the screensaver, it will prevent the additional resources from consuming significant system resources by allowing Dwm.exe to operate more efficiently.
Also, certain screensavers are not fully compatible with the graphics or dwm.exe, and by disabling it, the potential cause of conflict can be reduced.
This is how you can disable the screensaver:
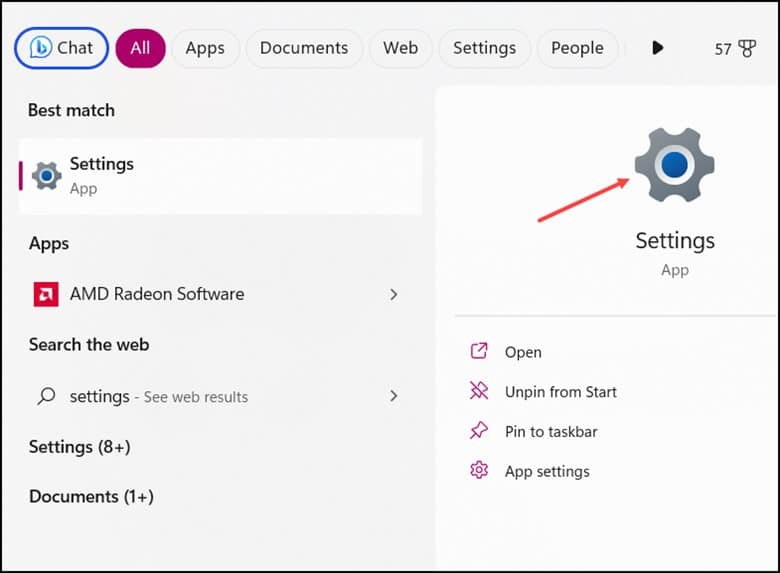
- Type “Settings” in the Search bar and open the first result.
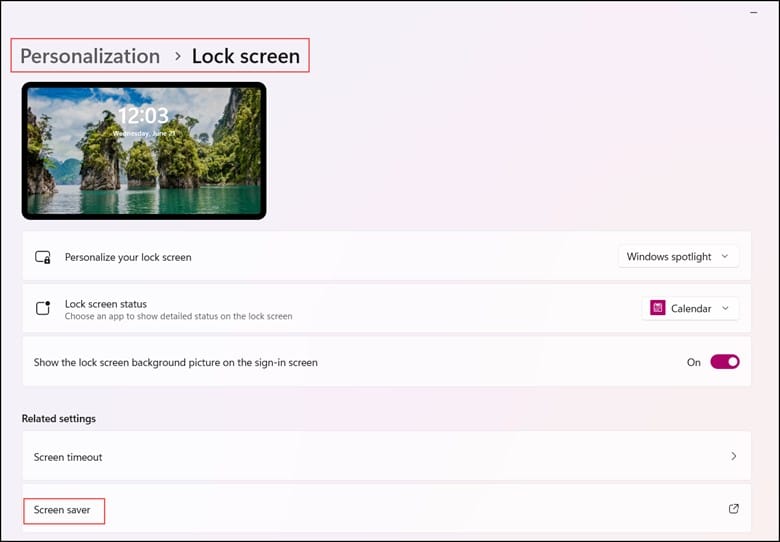
- From the Windows Settings, select Personalization.

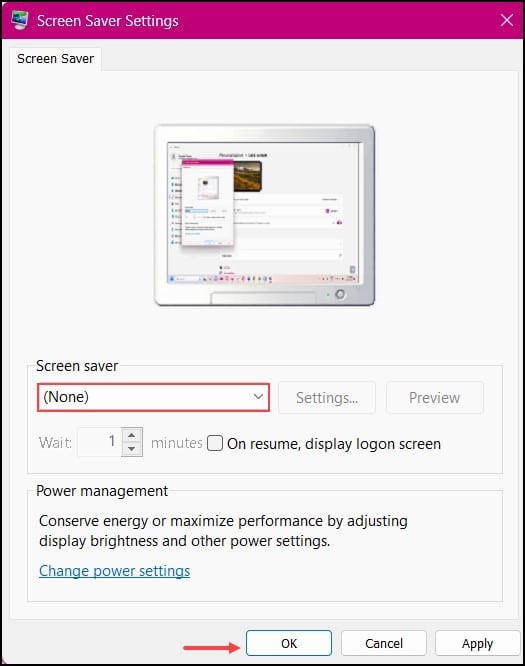
- Click on the “Lock screen” followed by the “Screensaver” option.
- In the new Window, select “None” under the screensaver drop-down menu.
- Finally, press “Ok.”
3) Change Wallpaper Or Theme
At times the conflicts between the graphics driver and certain wallpaper or theme can cause instability in Dwm.exe.
By changing the theme or the wallpaper, you can easily eliminate this issue and help it to function normally.
Here is how you can change the wallpaper or theme:
- Open Windows Settings and select Personalization.
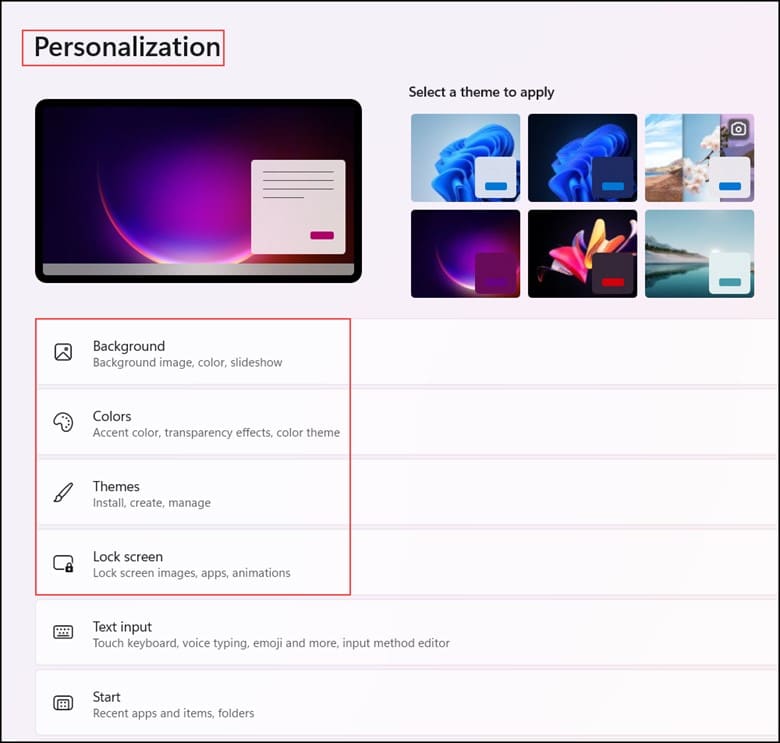
- Now, change the Background, colors, lock screen, and themes.
See if this can fix the problem, or else run the performance troubleshooter.
4) Run The PerformanceTroubleshooter
Windows provides a dedicated Performance troubleshooter that diagnoses and resolves issues related to the Desktop Windows Manager. This can fix the problems with dwm.exe.
Also, it will analyze the configurations and system settings that are known to impact the performance.
This is how you can run the Performance troubleshooter:
- Type “cmd” in the Search bar and choose to run Command Prompt as an administrator.

- Type “msdt.exe /id PerformanceDiagnostic in the elevated CMD window and then press Enter.
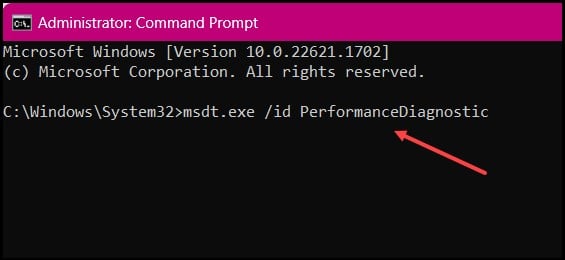
- Click on “next” in the Performance window to continue. See if this could fix the problem or else adjust the system for the best performance.
5) Adjust The System For the Best Performance
Adjusting the system settings for best performance will help in prioritizing the system requirements and will be helpful in the smooth operation of dwm.exe.
Make sure you monitor the system after you have adjusted the settings to ensure stability.
Follow these steps to adjust the Settings for the best performance in Windows 11:
- Right-click on Start and select “System.”

- In the next window, click on “Advance System Settings.”
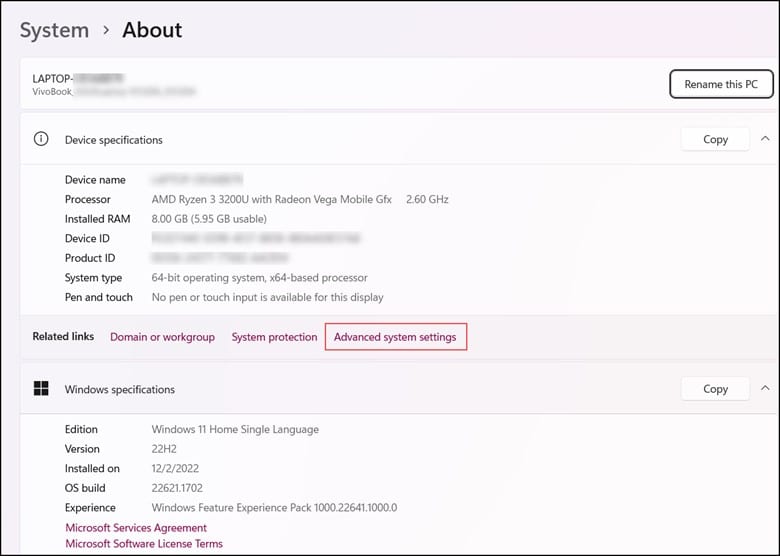
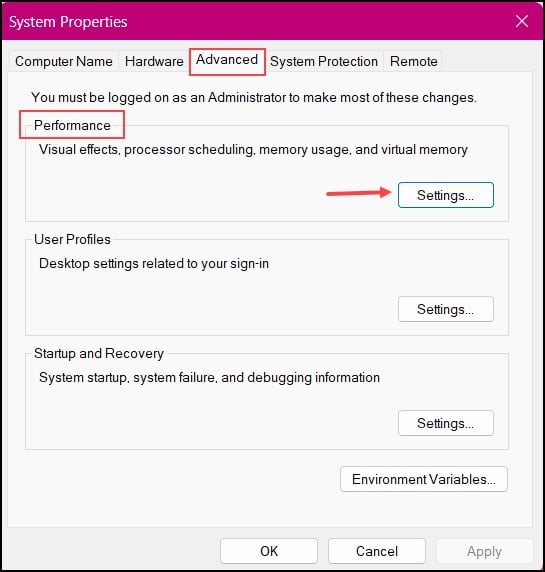
- On the “Advanced” tab, you need to click on “Settings” under the “Performance” section.
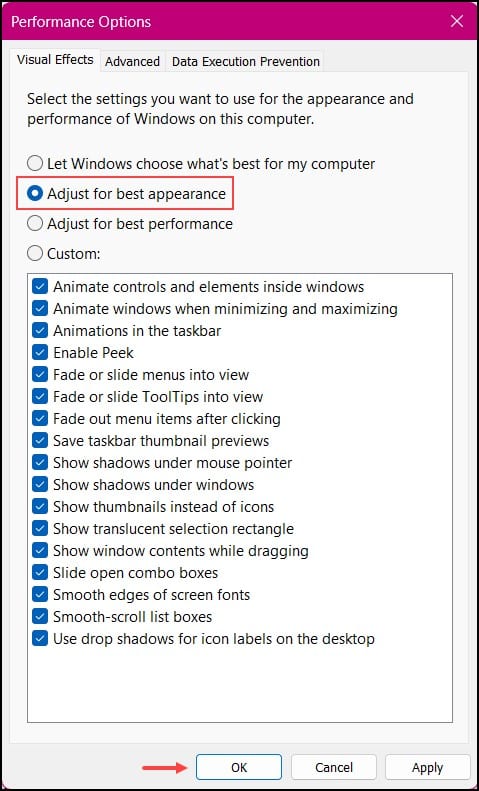
- Now, in the Performance Options window, choose “Adjust for best performance” and then click on “Apply” and “OK” to save the changes.
- If this cannot fix the issue, disable the hardware acceleration.
6) Disable Hardware Acceleration
Disabling hardware acceleration will address certain issues related to graphical rendering and performance that impact the functioning of dwm.exe.
It will also reduce the overall system load, which can indirectly benefit the performance and functioning of dwm.exe.
This is how you can disable hardware acceleration:
- Type “regedit” in the Windows Search bar, and choose the first option.

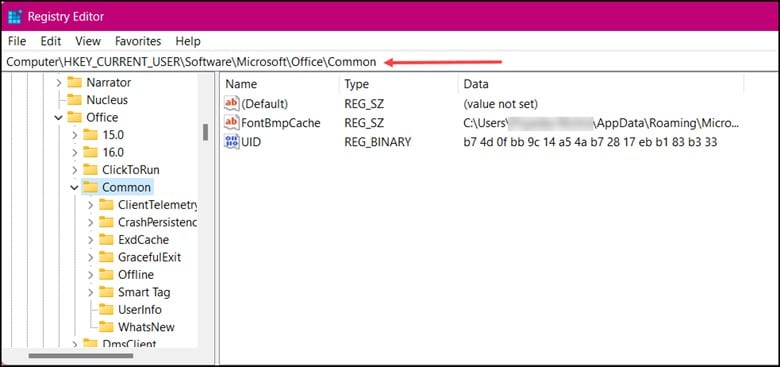
- In the next window, navigate the following path “Software\HKEY_CURRENT_USER\Software\Microsoft\Office\ Common”
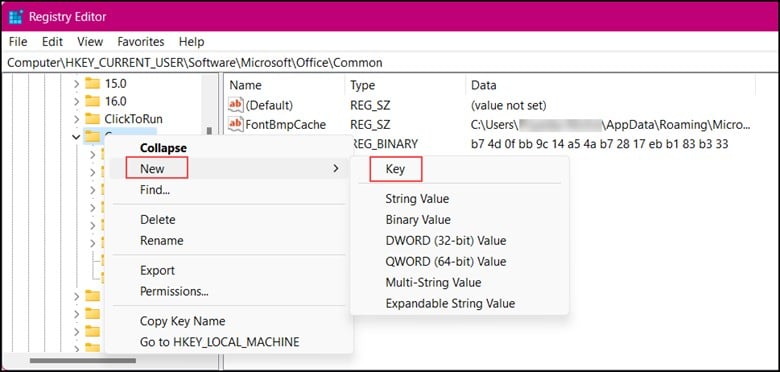
- Then, right-click on the Common Key and choose “New” followed by “Key” from the Menu.
- Type “Graphics” as the name of the new key.
- Right-click on “Graphics Key” and select “New” then select “DWORD(32-BIT) Value.
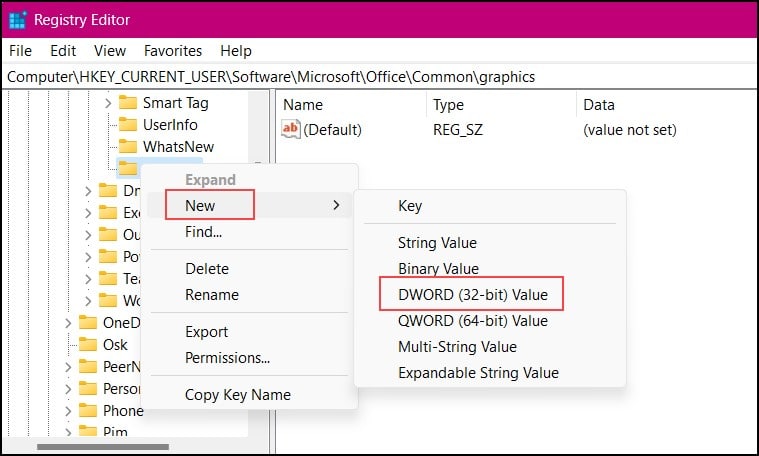
- Name it “DisableHardwareAcceleration” Double-click on the value and set its Value data to 1. Click on OK.

- Now, exit Registry Editor & restart your device.
Update the Display Driver if you still could not overcome the issue.
7) Update Display Driver
By updating the Display driver, the overall performance and stability of the graphics subsystem can be improved. This can help fix issues related to DWM.exe
The updates will also optimize the graphics rendering process and enhance the overall visual experience.
Here is how to update the Display driver:
- Open the Run utility by pressing the Windows + R keys on your keyboard.
- Type “devmgmt.msc” and press Enter.
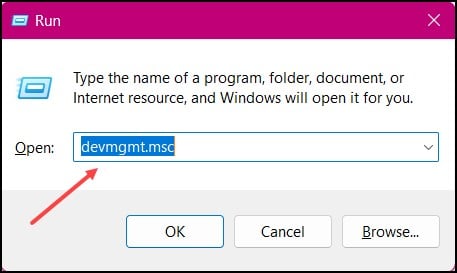
- Expand the “Display Adapters” section and then right-click on your graphics card.
- Then click on “Update driver.”

- Choose “Search automatically for updated driver software.”
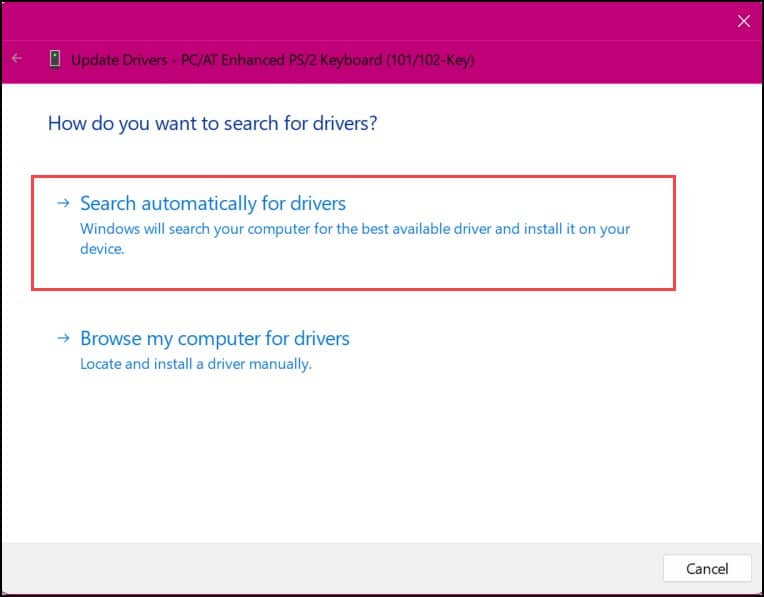
- After it gets over, Windows will search for and install the latest driver.
As soon as the update gets over, restart your device and look for the issue. If the issue persists, run an SFC scan.
8) Run SFC Scan
If the issue arises due to system file corruption, then running an SFC scan will resolve the issue.
Perform the steps to run an SFC scan:
- Open the elevated Command Prompt window.
- Next, type “sfc /scannow” and press Enter.

- Wait for the scan to get over, and then restart the device.
9) Run DISM Scan
If SFC could not fix it, then run DISM. If the issue is caused due to window image corruption, then DISM scan can fix it.
Follow the steps to run the DISM scan:
- Enter the command mentioned below after opening the elevated Command prompt:
“DISM /Online /Cleanup-Image /ScanHealth”
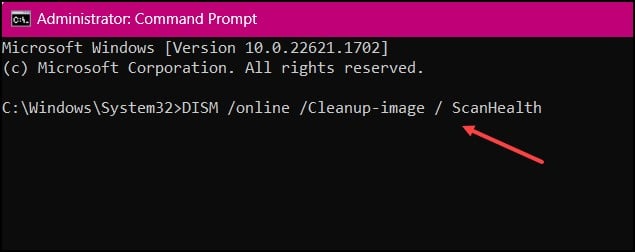
Press Enter and wait till Windows finishes running the command. Once done, restart your PC and scan it with your antivirus.
10) Scan The PC With Antivirus
If you are encountering a dwm.exe issue with your Windows 11 PC, then it can be due to the virus or malware present in your PC.
In this case, it is highly advisable to scan your PC for viruses and malware.
To do this, you need to take the help of Windows Security or any other third-party antivirus to scan the PC.
It is essential to keep the antivirus software up to date & perform regular scans to ensure the ongoing protection of your PC.
11) Disable Problematic Services
Few services that run in the background can conflict with dwm.exe or any other system processes that lead to performance issues, crashes, or instability.
By disabling them, the conflicts can be eliminated, and the smooth functioning of dwm.exe can be restored.
Search for and identify those specific services that are likely to be responsible for the issue.
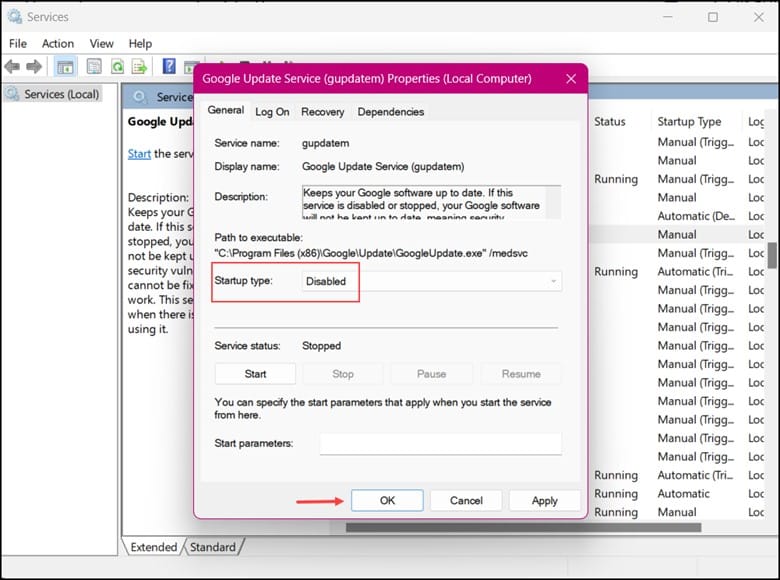
This is how you can disable those services:
- Open the Run utility and type “services. msc” in the Run utility.
- Next, click on the “OK” button.

- Look for the services you want to disable and right-click on each service. Then expand its Properties.

- Change the Startup type to “Disabled.”
- After doing this, click on “Apply” and “OK” to save the changes.
12) Update Software
Certain installed software are known to be responsible for making dwm.exe use high memory.
Ensure that your Windows OS and other installed software are all up-to-date.
Also, this will resolve conflicts between software components and dwm.exe, allowing smooth operation and better performance.
Frequently Asked Questions(FAQs)
- Can I Disable Dwm.Exe For Improving Performance?
No, disabling dwm.exe is not at all recommended, as it is an essential component of the operating system.
- Is dwm.exe A Legitimate Process, Or Could It Be Malware?
Yes, dwm.exe is a legitimate process, but some malware or viruses disguise themselves as dwm.exe.
- Why Is dwm.exe Using High CPU Or Memory Resources?
Sometimes, dwm.exe is known to use high CPU or memory resources for specific system configurations, incompatible graphics drivers, or conflicts with other applications.
Wrap Up
So, that’s it! That is all about dwm.exe in your Windows 11 operating system.
It’s time for you to reimagine your desktops by unleashing the full capability of dwm.exe.
Join us in the comment section provided below for any further discussion on the same.
Leave a Reply