In this article, we will give a complete guide on what a recovery partition is and how you can create one. We will also discuss how to delete a recovery partition as well as recover an accidentally deleted recovery partition.
This is the complete Windows 10 recovery partition guide that you have been waiting for.
What Is A Recovery Partition And Why Is It Required?
Contents
Recovery partition in simple words is that portion of the disk drive on your PC that holds the factory settings of the OS (or Windows 10 in this case).
So, if your computer undergoes some kind of system failure, then you will be able to factory reset your computer directly.
How To Create A Windows 10 Recovery Partition?
Now that you understand how useful recovery partitions are, here is how you can create one.
To create a recovery partition in Windows 10, follow the steps given below:
- Type Create a recovery drive in the Windows search bar and open the appropriate option.
- Click on Yes if any dialogue appears on your screen.
The Recovery Drive will now open on your screen. - Make sure that the Back up system files to the recovery drive box is checked and then click on the Next option.
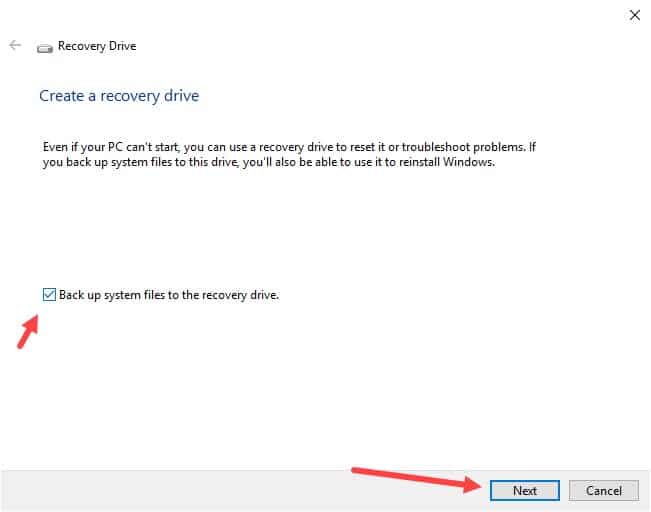
- Now, connect a USB drive and then click on the Next option.
- Select the Create option to create the recovery drive.

Some Other Things You Need To Know About Recovery Partitions
1) Restoring Recovery Partition
If you are facing any problems related to your OS or if your OS has become corrupted and you are in urgent need to restore your PC, then you can do so using the recovery partition.
To use the recovery partition for restoring your PC, follow the steps given below:
- First, connect the recovery drive that you have created to your PC and restart the computer.
The Choose an Option panel should be up on your screen when the PC boots. - Click on the Troubleshoot option and then click on the Recover from a drive option.
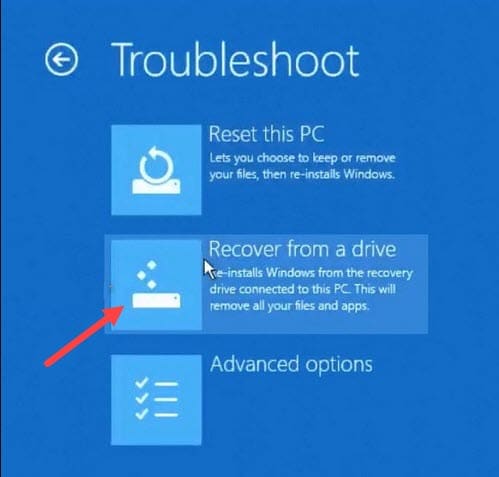
Now, follow the instructions on your screen and wait until the system gets completely restored.
You can also recover the deleted operating system using the recovery partition.
2) Deleting A Recovery Partition
You are probably wondering now that how you can delete a recovery partition now that you have created it. To delete a recovery partition, follow the steps given below:
- Open the Run utility by pressing the Windows + R keys on your keyboard.
- Type cmd and press the Ctrl + Shift + Enter keys to open an elevated Command Prompt.
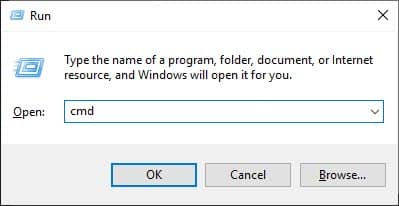
- Type diskpart and press Enter.
- Next, type list disk and again press Enter.
A list of disks will appear on the Command Prompt.
Note down the number of the disk with the recovery partition. - Now, type select disk # (Note: # is the number of the recovery partition disk) and press Enter.
- Type list partition and again press Enter.
The list of partitions of the disk will be displayed on your screen.
Note the number of the recovery partition. - Type select partition # (Note: # is the number of the recovery partition) and again press Enter.
- Finally, type delete partition override and press Enter.
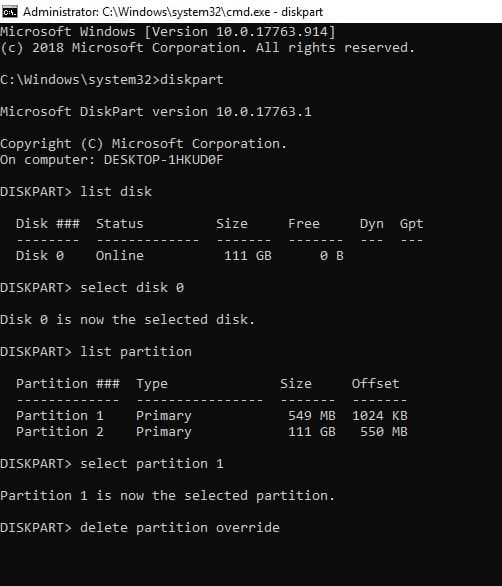
Close the Command Prompt and check if the partition has been deleted.
Wrapping Up
So, we have come to the end of this article and now you have gotten an idea about Windows 10 recovery partition from this guide. As always, feel free to share your thoughts on this article in the comment section below.
Leave a Reply