Do you also take pictures without holding the camera in the right orientation? Everyone has made this mistake at least once in their life. Fortunately, this is not a permanent issue. You can easily rotate images on Windows 10 and fix the orientation.
In this article, I have discussed how to use the Windows rotate image feature. You might be surprised at how many ways you can do this.
Also, check out this article on 6 best free photo editing software for Windows 10.
How To Use Windows Rotate Image Feature?
Contents
You can rotate a picture on computer easily using many different methods. Below I have mentioned 4 methods on how you can do it. Also, all the methods given below can rotate multiple images at the same time if they are selected.
Method 1: Use The Keyboard Shortcuts To Rotate Images
You can easily rotate any image clockwise and anti-clockwise using some of your keyboard keys. First, open File Explorer by pressing the Windows + E keys and navigate to the folder that has the image you want to rotate. Then, press the left Alt key. After that, press the J+P keys. Now, press R+L keys to rotate the image anti-clockwise (to the left) and press R+R keys to rotate clockwise (to the right).
Method 2: Use Ribbon Menu In File Explorer
To use the ribbon menu in File Explorer to rotate image images, follow the steps given below:
- Open File Explorer again and navigate to the folder that has the image.
- Click on the Manage tab.
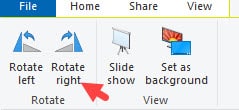
- Now, click on the Rotate Left and Rotate Right options in the ribbon menu to rotate the selected image.

Method 3: Use The Right-Click Menu
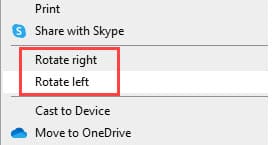
The right-click menu is another easy way to rotate the image. Simply, right-click on the image and select the Rotate Left or Rotate Right option.

Method 4: Use Windows Photos App
Open the Image in the Photos app. To rotate it you can click on the Rotate icon in the Photos ribbon menu. Or you can press Ctrl + R to rotate it to the right. However, there is no option to rotate left in Photos.
How To Auto Rotate Photos In Windows 10?
There is no option in Windows 10 to auto-rotate the images. However, you can download the 3rd party software called JPEG Autocorrect. After installing this app, an option in the right-click context menu will be added.
Now, you can right-click on any image and select the new Auto rotate option. The image will be auto rotated to the correct orientation. This app is very useful to correct the orientation of multiple pictures at the same time. Just select all the images, then right-click on any one of the selected images and select the Auto-rotate option.
How To Flip A Picture In Windows 10?
In Windows 10, you can also flip an image without using any 3rd party apps. However, the option is somewhat hidden. To flip an image on Windows 10 using Windows Photos app, follow the steps given below:
- Open the image in the Windows Photos app.
- Click on the Get creative with the photo icon (pencil and paintbrush crossed).
- Select the Edit option from the menu.
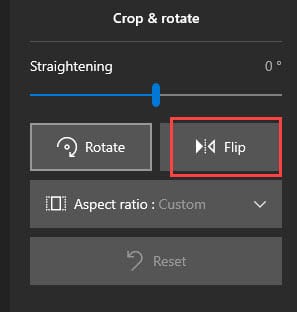
- Click on the Crop & rotate option and then select the Flip option on the right pane.

Wrapping Up
So, there you have it. Now you know how to use Windows rotate image feature. If you have any questions related to this topic, ask them in the comment section.
Leave a Reply