Windows Defender has always been an essential component in Windows 10. The native antivirus is powerful and can handle most threats for your PC. The Windows Defender is now a permanent icon in the notification tray after a recent Windows update.
This is useful for users who only use Windows Defender to protect their computers. This way they get to access it easily. However, many users (mostly who use 3rd party antiviruses) are annoyed to see the Windows Defender in the notification tray. In this article, I have discussed how to remove Windows Defender from tray using various methods.
Also, check out:
How To Remove Windows Defender From Tray?
Contents
The notification tray is the area where all the essential applications have shortcuts. Any application not essential to the user only holds extra space in the tray. Many users that use 3rd party Antivirus find it annoying that the Windows Defender notification icon is present in the tray even after it is not being used by the user.
These users want to remove Windows Defender from taskbar notification tray. Removing the Windows Defender notification icon from the tray is possible but is a little tricky. There isn’t any option provided by Windows 10 to simply remove it from the tray. To do it, you need to follow the methods given below.
Method 1: Remove Windows Defender From Taskbar Tray Using Task Manager
One of the easier ways to disable the Windows Defender notification icon in the tray is through the Task Manager. Task Manager keeps the record of every process running in your PC, including the securityhealth startup process.
SecurityhealthSystray.exe startup process is responsible for the Windows Defender notification icon in the taskbar notification tray. You can disable this process to launch at startup using Task Manager. This will remove Windows Defender from the tray.
To disable securityhealth startup process from launching the tray icon, follow the steps given below:
- Press the Windows + Shift + Esc keys to open the Task Manager.
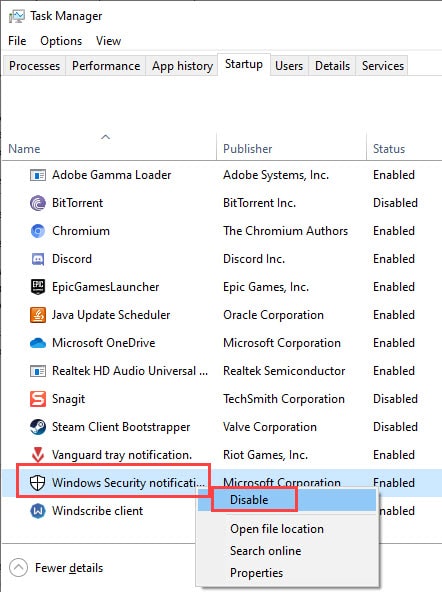
- Select the Startup tab and right-click on the Windows Security notifications option.
- Click on the Disable option to remove the notification icon from the notification tray.

Now the securityhealthsystray.exe process won’t start on startup and you are rid of the Windows Defender icon from the notification tray.
Method 2: Remove Windows Defender From Taskbar Entirely
Another effective way to remove the Windows Defender icon from the taskbar tray is to disable the icon from the taskbar settings. By doing this, the Windows Defender icon will no longer have the permission to appear on the Taskbar.
To do it, follow the steps given below:
- Press the Windows + R keys to open the Run utility.
- Type ms-settings:taskbar and press Enter to open taskbar settings.
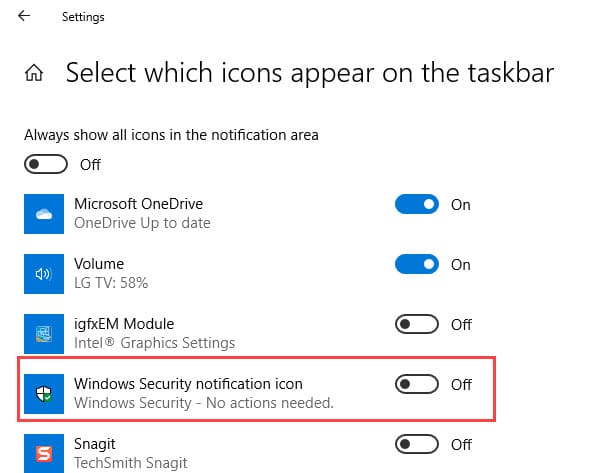
- Locate the Select which icons appear on the taskbar option in the Notification Area section and click on it.
- Find the Windows Defender notification icon toggle and disable it.

After completing the above steps, the Windows Defender icon will be removed from the notification tray.
Method 3: Remove Windows Defender From Tray From Startup Menu
You can also disable the Windows Defender icon from the Startup menu. To do it, follow the steps given below:
- Open the Run utility again.
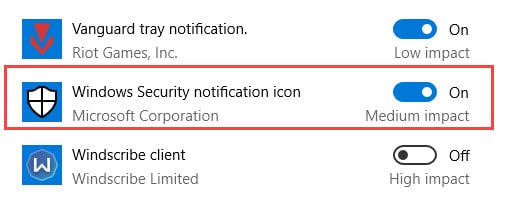
- Type ms-settings:startupapps and press Enter to open Startup menu.
- Locate the Windows Defender notification option in the Startup section and turn off the toggle. This will disable the SecurityhealthSystray.exe and the icon will be removed from the tray.

Method 4: Remove The Icon Using the Local Group Policy Editor
If you are using the Enterprise, Education, or Pro versions of Windows 10, then you can remove the Windows Defender icon from tray using the Local Group Policy editor.
To do it, follow the steps given below:
- Open the Run utility again.
- Type gpedit.msc and press Enter to open the Local Group Policy editor.
- Navigate to the following location:
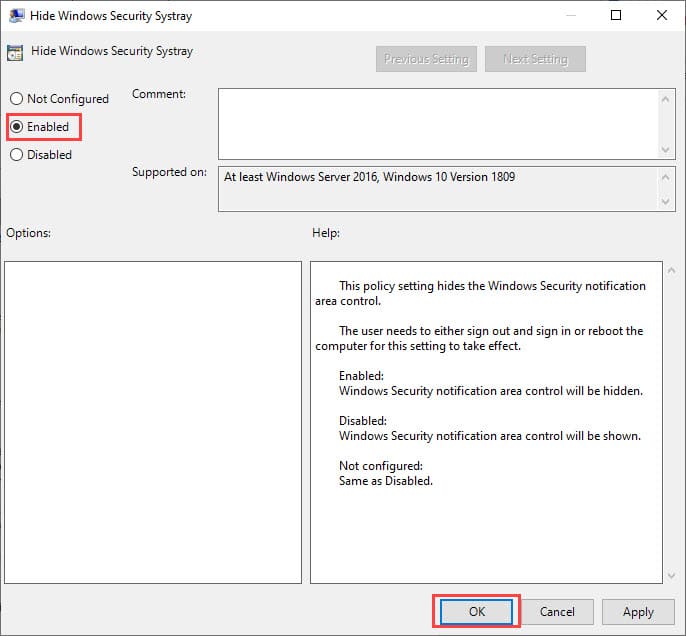
Computer Configuration \ Administrative Templates \ Windows Components \ Windows Security \ Systray - Locate and double-click on the Hide Windows Security Systray policy on the right-pane.
- Set the policy to Enabled and click on OK to save the changes.

Method 5: Remove The Icon Using the Registry Editor
You can also use the Registry Editor to remove the Windows Defender tray icon. To do it, follow the steps given below:
- Open the Run utility.
- Type regedit and press Enter to open Registry Editor.
- Navigate to the following location:
HKEY_LOCAL_MACHINE\SOFTWARE\Policies\Microsoft\Windows Defender Security Center\Systray - On the right pane, double click on the HideSystray DWORD and change the value to 1. If the HideSystray DWORD isn’t present, right-click on the white area and select New > DWORD (32-bit) and name it HideSystray.
That’s it. Now the Windows Defender tray icon will be removed.
Wrapping Up
So, there you have it. Now you know how to remove Windows Defender from tray. If you have any further questions related to this topic, ask them in the comment section below.
Leave a Reply