Steam, the massive game distributing platform, is well known among gamers. Over the years it has evolved into a gaming community as well. Gamers from all over the world comment, discuss and rate games on Steam.
It also has a dedicated section for game bugs and issues so that users can share and find solutions. Steam allows users to upload images in chat, which is very convenient especially when you are reporting a game bug.
However, recently many users have complained that the images are not uploading on Steam, whether it be in chat or changing the profile picture. In this article, I have discussed what to do when a Steam image failed to upload.

Also checkout:
Why Steam Image Failed To Upload?
Contents
If you can’t upload an image on Steam, it can be related to several different issues. Here are the potential causes of this error:
- Bad Internet connection: The most likely reason you are unable to upload any image on Steam is that you have a bad internet connection. A slow or unstable internet connection can lead to such issues.
- Firewall: It is possible that the Windows Firewall, or any other 3rd party firewall you may use, is preventing Steam from working correctly and upload images.
- Antivirus: Similar to firewalls, Antiviruses are known to become overprotective and interfere with other programs. It is possible that your antivirus is preventing Steam from uploading images.
- Lacks required permissions: If Steam does not have the necessary permissions for uploading the image from your PC, then such an issue will arise.
What To Do When Steam Failed To Upload?
Now that you know the potential causes of this issue, it is time to troubleshoot it. Here I have provided the troubleshooting procedure you should follow in order to fix this issue.
Solution 1: Log Out And Log In Again
The old troubleshooting method of logging out and in again, is known to fix many minor bugs and errors. Try doing it and see whether it fixes this issue. To log out and log back in, follow the steps given below:
- Open Steam and click on your account profile picture button. It will be located in the top right corner of your screen.
- Select the Log Out option from the drop-down menu.

- Close Steam and restart it.
- You will be prompted to enter your login details. Enter the login credentials and log back in.
After you have logged in, check if you can upload the images now.
Solution 2: Check Your Internet Connection
After you have tried logging back in, it is time to check your internet connection. Slow internet speed or unstable connectivity can lead to such an issue. Check your internet speed and stability by visiting this website (here).
If you are unsure about what is a good internet speed, then you can read this article here. Now, that you have checked the internet speed and stability, if you find that it is unusually slow or unstable then you will need to troubleshoot.
Until your internet speed is fast enough and stable, you will be unable to upload images on Steam. You can read this article on what to do when the internet speed is slow and learn how to troubleshoot this issue.
Solution 3: Wait For Some Time (Slow Steam Server)
The steam server usually has high traffic, which can slow certain features or even prevent them from working. Uploading Steam images is one such thing.
Many users have reported that even after failing to upload an image at a certain time, it works when they try uploading it later. This means that due to high traffic on Steam, the image upload can fail.
Attempt to upload the image a few times. If still Steam image failed to upload, try it after some time. If waiting for a long time doesn’t fix this issue, then it stems from something else. Try the next solution.
Solution 4: Use Simple Image Names
One issue that prevents images from being uploaded in Steam is using coded font. If the Steam profile picture won’t upload, then it is likely due to this issue.
Exempt from naming images anything fancy, like avoid different coded fonts, don’t use any punctuation marks in the name. In other words, avoid names like ‘amazing.picture.PNG’. Keeping the name simple has helped many users fix this error.
Solution 5: Make Sure The Image Is Not Embedded
Another thing that can prevent the image from uploading is an embedded image link. If you have downloaded the image from somewhere unknown, then check if any link is embedded in it. If yes, then remove them and then try to upload it.
Also, if you are making this image in paint.net, photoshop, or some other similar software, then don’t use any plugins to make it.
Solution 6: Check The Format And Size Of The Image
Two other factors determine whether Steam image fails to upload. The first factor is the file format of the image. Make sure you only use PNG or JPEG file formats. If the image is in another format, then you will have to convert it. Use Photoshop or Paint to do so.
The other factor that is important is the size of the image. If you can’t upload Steam Avatar, then it is likely due to this factor. The Steam group picture size cannot be more than 1024 kb, else it won’t upload.
If you try to upload an avatar image bigger than the mentioned value, then it will trigger the following error message: ‘The file you tried to upload was too large.
Please upload a file smaller than 1024 kb. You can decrease the file size by downscaling the image in Paint or other editing software.
After downscaling the image, you should be able to upload the image.
Solution 7: Use Steam Web
If you have made sure that the above image restrictions are upheld but still the issue persists in the Steam app, then try using the Steam web client.
You may even try to upload the image in the Steam app and just after that in the Steam web client. Sometimes the app can bug out and trigger such issues. In such scenarios, using the Steam web client is a good way to work around the bug.
Visit Steam web and enter your login details. Now upload your profile pic or if you were trying to upload an image in the chat then try that.
Solution 8: Turn Off Compact Friends List And Chat View
A couple of years ago Steam introduced the Compact friend list and chat view. This feature makes chatting much simpler on Steam than it was used to.
However, I have seen some reports from users saying this feature can interfere with uploading images. By default, this feature is disabled in Steam, but if you have enabled it in your Steam account, either knowingly or unknowingly, try disabling it.
To disable the Compact friends list and chat view feature, follow the steps given below:
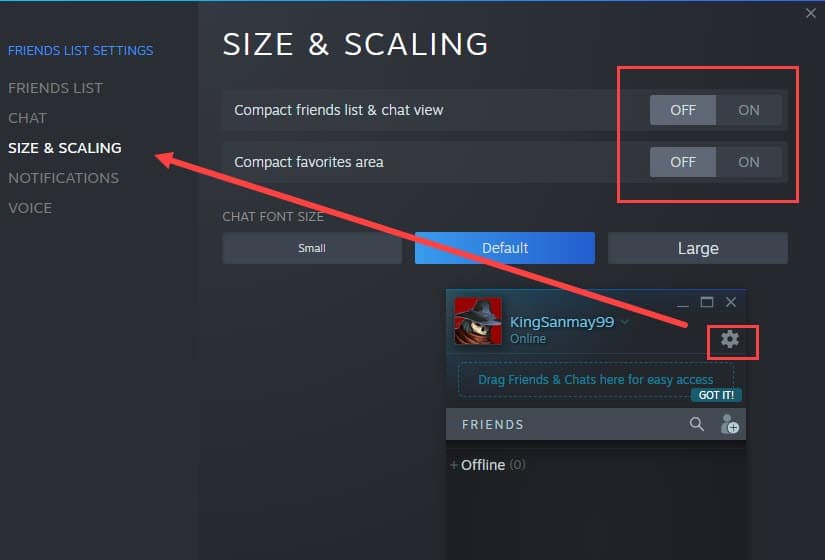
- Open Steam and click on the Friends & Chat option in the bottom right corner of the screen.
- Now, click on the Settings icon (gear-shaped icon).
- Select the Size and Scaling option on the left panel.
- Turn off the Compact Friends list and chat view option.
- Close Steam and restart.
Now, check whether you can upload images or not. If still Steam profile picture won’t upload, then it can be due to outside interference. Try the next solution and see whether it solves this issue.
Solution 9: Open Steam With Administrative Privilege
There is a possibility that Steam image failed to upload because it doesn’t have the required permissions. If this is the case, then try opening Steam with administrative privileges. To do it, follow the steps given below:
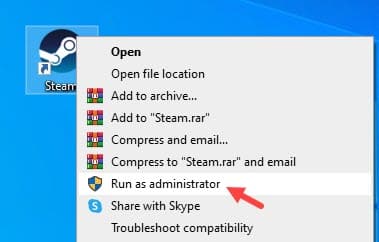
- Right-click on the Steam client executable on your desktop.
- Select the Run as an administrator option.
- Wait for Steam to open and check if you can upload an image or not.
If you are able to upload an image on Steam, then the issue was due to insufficient permissions. Now, either you can keep using the above steps to run Steam as administrator each time, or set Steam to run as administrator by default.
To set Steam to always run as administrator, follow the steps given below:
- Right-click on the Steam client executable on your desktop.
- Select the Properties option.
- Click on the Compatibility tab.
- In the Settings section, check the Run this program as an administrator box.
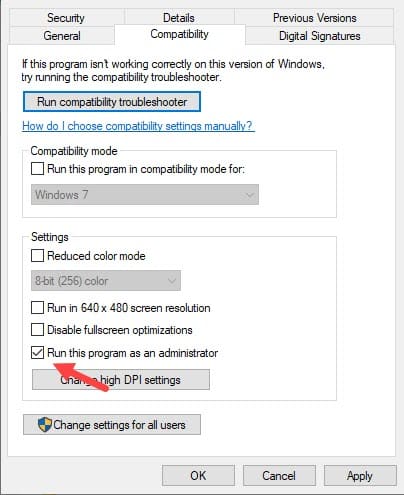
- Click on Apply and OK to save the changes.
Solution 10: Disable Firewall And Antivirus
If the above solutions don’t work, then the last thing you can try is to disable the Firewall and Antivirus on your PC. Antivirus and firewall are known to interfere with programs and prevent them from working correctly.
This can be why the Steam image failed to upload. To disable Windows Defender, follow the steps given below:
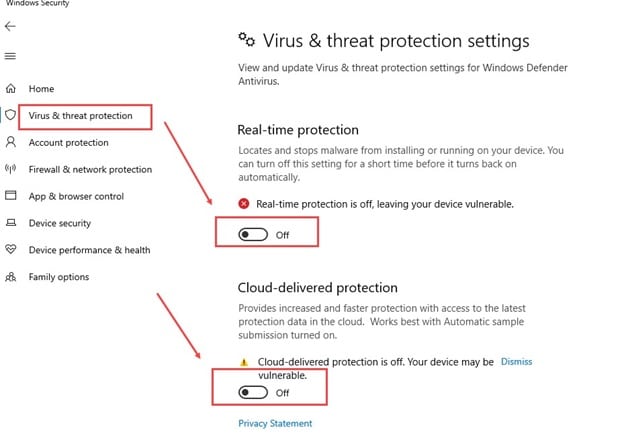
- Type Windows Security in the Start menu and select the top result.
- After Windows Security opens, click on Virus and threat protection option.
- Select the Manage settings option in the Virus and threat protection settings section.
- Disable the Real-time protection toggle.
To disable Windows Firewall, follow the steps given below:
- Type Windows Defender Firewall in the Start menu and select the top result.
- On the left panel, click on the Turn Windows Defender Firewall on or off option.
- Check the Turn Off Windows Defender Firewall (not recommended) circle for both private and public networks.
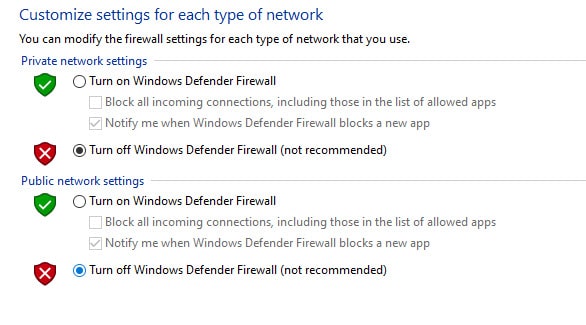
- Click on OK to save the changes.
Wrapping Up
So, there you have it. Now you know what to do when a Steam image failed to upload. The above solutions should help you fix this issue. If you have any questions related to this topic, ask them in the comment section below.
Could you please provide an example about ‘Solution 4: Use Simple Image Names”, it would be helpful for me.